Page 1 of 2
Wiring Butchered!! Need Help
Posted: Thu Dec 14, 2006 12:26 pm
by cseger1
So I got my 81 SD22 powered 720 home and surveyed the damage. It is extensive. I have been reading through this board for three days and I think I am getting more comfotable with many of the concepts. This is my first diesel. One of the PO's was the worst mechanic of all time and had the truck for many years to hone his skills. Here are the highlights:
Every electrical circuit in the truck failed and was patched around (possibly by apes).


There seems to be a TOW CHAIN holding the motor down on the left side motor mount.


The injection pump controller arm was removed and a cable was added to the cab for shutting down the motor. What happens to the IP if it sits termianlly in the run position?

So far I got the truck home with the aid of a new battery and starter fluid. I put about 120 miles on it getting to this point. It ran great until this morning when it wouldn't start. The solenoid in the starter goes "click buzzzz". Shorting the starter at the solenoid produces the same result. At this point I decided to unbutcher it. With the aid of Al Savage's online manual I may stand a chance. Probably not before my wife kills me. Anyway, given the brief description and pictures I put up, what would y'all recomend?
Posted: Thu Dec 14, 2006 12:32 pm
by cseger1
And what should be plugged in here? I can't find the matching ends to these two. They are up near the firewall on the pass side.

Posted: Thu Dec 14, 2006 2:58 pm
by philip
cseger1 wrote:And what should be plugged in here? I can't find the matching ends to these two. They are up near the firewall on the pass side.
First let me say that "butcher" ought to be deported just on principle.
On the battery + clamp, there is a fuseable link group. System, charging, glow plus, and more are protected here.
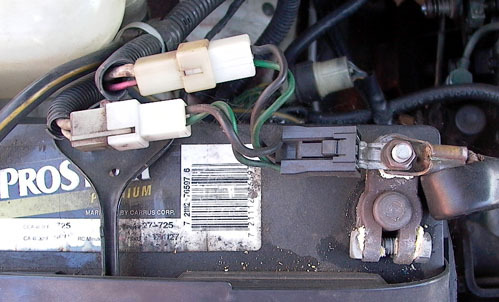
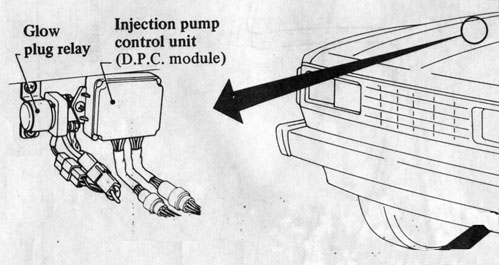
The two plugs are for the missing DPC module. This module controls the Injection Pump Control mechanism under the Injection Pump (probably missing now?)
DPC System
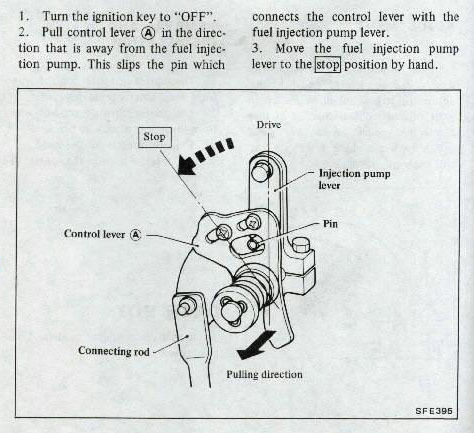
There is no damage being done by leaving the Fuel Control Lever on the RUN position after the engine comes to a stop.
Posted: Thu Dec 14, 2006 3:20 pm
by redmondjp
I'm 100% behind you for getting things back to stock. With that being said, however, there's nothing wrong with a well-implemented manual start system (as used on 1000s of diesel tractors over the decades), and you're pretty close to that now. Especially if you want to try to use the vehicle while you're rounding up the missing parts.
You would need to replace that 'pull-only' cable with a 'push-pull' one (try a marine parts place) such that you can get the IP control into the 'start' position. You could also install a second 'pull' cable but on the opposite side of the lever, to get into the 'start' position.
And a momentary pushbutton or toggle switch, controlling a heavy-duty 12V relay or solenoid for the glow plugs, will work just fine (although it won't have the after-glow capability which is definitely nice to have). I'm working with some 555 timer circuits at work right now, so I could come up with a delay circuit that would keep your glow plugs energised for X seconds after letting go of the switch, which would get you close. I can't tell if that switch you are showing is momentary or maintained--if maintained (meaning switch stays 'on' until you turn it off), I would definitely change that right away.
Just throwing some ideas out there . . .
from your pictures, I'd say that your truck had an IPCectomy and a fairly clean one at that--more surgeon-like than done by a butcher. All you have to do is reinstall the original parts and remove that cable. GPCectomy done too, although not as clean (it never is).
Posted: Thu Dec 14, 2006 6:23 pm
by cseger1
Any idea about the chain on the motor mount?
Posted: Thu Dec 14, 2006 8:33 pm
by philip
cseger1 wrote:Any idea about the chain on the motor mount?
Longitudinally mounted engines will torque away from the driver's side engine mount. In all likelyhood, the rubber is separated from the metal base which would permit the engine to lift up, pivoting up on the passenger side mount when letting the clutch out especially in 1st gear ... typical of slogging up dirt grades where traction is being gained and lost repeatedly. New mount needed. No doubt all that oil caused the mount failure.
Check also your driveshaft carrier bearing rubber support
Posted: Sun Dec 17, 2006 10:52 am
by ffdjm
The "click bzz" often means a bad connection in the cable from battery to starter. The next time you hear the click bzz check the cables for warm spots which indicate a bad connection and replace as needed. OEM starter cables on the SD22 eventually fail at the battery end due to excessive flexing. The usual fix is a the replacement terminal shown in your photo. These usually do not make a good connection. Replace the whole cable. The correct size seems to be 2. I used arctic welding cable to get good flexibility and crimp on terminals from a local shop that sold solar power supplies. And yes, I know this is overkill.
As long as your glow plugs work the engine will start without the pump controller being put in start position. The exception being very low temperatures, when manual control may be justifiable. The DPC motor is vulnerable to water; mine lasted until the first big rainstorm when I hit a puddle. I replaced it with a piece of thick cord from the dashboard to the pump to stop the engine. The glow plug controller is reliable. Mine has lasted 298k miles.
Douglas
Posted: Sun Dec 17, 2006 11:28 am
by philip
ffdjm wrote:The "click bzz" often means a bad connection in the cable from battery to starter. -SNIP
It's worth mentioning here that a major wiring harnass ground is crimped to the OEM battery negative cable about a foot away from the battery.
Take the time to wire brush the eyelet and to remove all the body paint around the body hole.
Harnass ground below battery
I still have both my original cables but I had to replace the positive clamp when I bought the truck.
Posted: Fri Dec 22, 2006 1:41 pm
by zen
re the ip start/run/stop controller...
as stated a solid cable works fine...if no marine shops about you will find lots of cars use solid cables for the hood release..i use one from a land rover for example..
good luck.(espically with the wife!!

)
Posted: Sat Dec 23, 2006 5:57 am
by cseger1
Update:
The first thing I did was clean all the connections from the battery wires. The one by the battery was painted and covered in dirt. Its bare and clean now.
Then I got new main cables and cleaned the starter's terminals. No help. Even shorting the starter had no effect. I decided a new starter would cure it. $77 from O'rielly rebuilt. The swap was way easier than I anticipated after reading the starter threads. The truck fired right up with the new starter.
I got a new fuel filter in it and changed the oil. She runs like a top now. She eats a LOT of oil though. I think its time for a ring job. How long does it take if you DIY and what would a shop charge?
Christian
Re: Wiring Butchered!! Need Help
Posted: Sat Dec 30, 2006 11:02 pm
by asavage
cseger1 wrote:There seems to be a TOW CHAIN holding the motor down on the left side motor mount.
There's a
right-side '81-82 720 diesel motor mount on eBay right now for ($10 + 6).

Posted: Mon Jan 01, 2007 9:22 pm
by cseger1
Thanks for the heads up. I saw it too, my chain mount is on the left side. In other news the charging system has failed. I haven't gotten a chance to trouble shoot but I think the alt. is FUBAR. Any good advice on running down problems with the alt? So far what I know is voltage is at 12.10 running or not. I have it on the battery tender now.
Posted: Mon Jan 01, 2007 9:59 pm
by asavage
cseger1 wrote:I haven't gotten a chance to trouble shoot but I think the alt. is FUBAR. Any good advice on running down problems with the alt? So far what I know is voltage is at 12.10 running or not.
12.1v is way too low. Charged battery = ~12.6v, and running voltage must be above 13.5v minimum.
See
my post on the SD22 alternator diode and VR problems, including info about the shaft seal that
must be replaced if you open up this alternator (so buy it beforehand!). Unless you have been into a couple of alternators and are very comfortable doing quite a bit of soldering, I advise replacement of the entire assy.
However, brushes are easy to replace on this alternator, and can be done without removing the alternator (unless you have an A/C compressor above it), so naturally that would be the first place to look.
Sometimes you can get a good deal on a cheap rebuilt alternator from eBay.
Posted: Mon Jan 01, 2007 10:46 pm
by philip
cseger1 wrote:SNIP- Any good advice on running down problems with the alt? So far what I know is voltage is at 12.10 running or not. I have it on the battery tender now.
To Al's information I would add only that you confirm that all four fuseable link wires (2 green, 2 black) are conducting electricity (amperage), located off the positive battery clamp.
Posted: Tue Jan 02, 2007 5:27 am
by cseger1
Fusible links are MIA. The 4 wires from the harness go direct to the pos. terminal via a spade connector and a wire nut. There is one wire going to the alt. from the pos. terminal as well. The whole thing is a huge mess. I have been thinking hard about getting one of those "Painless" wiring harnesses that they build for hot rods. It would be hugely labor intensive but at least I'd know what was what.
I got an ebay rebuilt alt. from a guy here in TX. Should be in tomorrow. I'll gove a report on what kind of shape its in when I get it.
My FSM came yesterday so I am happy about that.