* Brakes *

Dealing with all subsystems specific to the diesel powered Datsun-Nissan 720 pickup trucks.

Moderators: plenzen, Nissan_Ranger

User avatar
asavage
Site Admin
Posts: 5434
Joined: 18 years ago
Location: Oak Harbor, Wash.
Has thanked: 1 time
Contact:

#16

Post by asavage »

moose60 wrote: I've just gotta find a spare bolt of the correct size to drive the drums off.
It's either a std-pitch 6mm or 8mm -- I think the latter. Think 12mm/13mm wrench size. Use lots of penetrating oil through the hole and around the studs before attempting the push-off bolt, because the drum is thin and doesn't have robust threads.
I learned the exact same maneuver in my 69 bug. I mostly did it when the ground was wet, or I was on gravel.
Oh, yeah, I never did it on dry pavement, the chassis loading would have broken something. It worked great on wet pavement though.
Regards,
Al S.

1982 Maxima diesel wagon, 2nd & 4th owner, 165k miles, rusty & burgundy/grey. Purchased 1996, SOLD 16Feb10
1983 Maxima diesel wagon, 199k miles, rusty, light yellow/light brown. SOLD 14Jul07
1981 720 SD22 (scrapped 04Sep07)
1983 Sentra CD17, 255k, bought 06Jul08, gave it away 22Jun10.
User avatar
philip
Deceased
Posts: 1494
Joined: 18 years ago
Location: Southern California, USA

#17

Post by philip »

asavage wrote:SNIP. Don't forget to grease the shoes. If you don't know what I'm talking about and think I'm nuts, read up on proper brake service. SNIP But don't forget to grease the shoes.
This is a FREQUENTLY overlooked service point that WILL make all the difference in the world when there is a complaint of notchy or locking drum brakes.

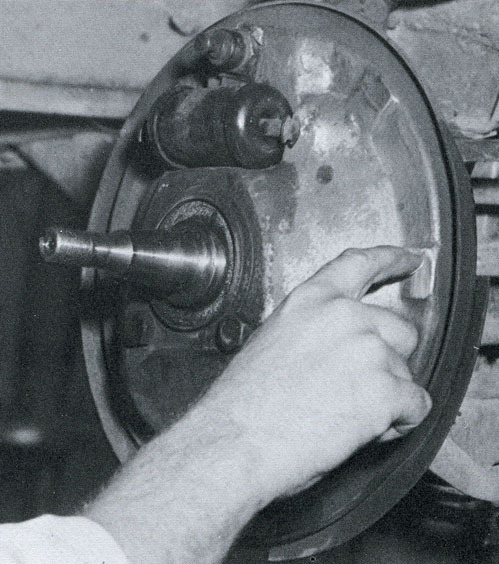
Here's what happens: The hold shoe down spring(s) push the shoe againt the backing plate. The metal edge of the shoe will have typically three tabs or deformations that contact corresponding wear pads on the backing plate. Over time and with insufficient lube grease (Lubri-Plate) present, these edges cut a deep groove into the backing plate. This forces the shoe to climb out of the groove each time the brakes are applied. NOT desireable.

These wear grooves can be repaired by filling them in with weld and then grinding the pad flat again or ... by replacing the backing plate. Either way, this all important service point gets passed over by the shade tree mech.

Image
-Philip
Passed 08May2008
My friend, you are missed . . .

1982 Datsun 720KC SD-22

"Im slow and I'm ahead of you"
User avatar
philip
Deceased
Posts: 1494
Joined: 18 years ago
Location: Southern California, USA

#18

Post by philip »

asavage wrote:SNIP The latter is not an issue with caliper designs that have pistons on both sides of the rotor -- all 720s (AFAIK) have single-piston calipers that slide in the spindle.
Early years 720 had a 'novel' old design caliper. The caliper is fixed and has two pistons at opposit ends of a single bore. One piston pushes directly on the inner pad while the other piston utilizes a forged linking yoke to reach around to the outboard pad to push it toward the disc.

This was replaced with a conventional single piston floating caliper in '83 and fitted with larger pads.
asavage wrote:SNIP On the hold-off valve: ECI's site says, "These valves are used for the front disc brakes in a disc/drum braking system to provide a "hold-off" feature so as to allow the rear drum brakes to actuate first. This function is essential for correct system operation. "

I think that's almost complete BS.
Accept the reality ... for some systems of yore. Drum brake system has to move more fluid before the shoe applies and then ... the shoe itself bends with brake pedal pressure and does the drum distort slighly. And lets not forget about times of excessive shoe / drum adjustment.
Last edited by philip 17 years ago, edited 1 time in total.
-Philip
Passed 08May2008
My friend, you are missed . . .

1982 Datsun 720KC SD-22

"Im slow and I'm ahead of you"
moose60
Posts: 168
Joined: 18 years ago
Location: Seattle WA

#19

Post by moose60 »

I have leaky wheel cylinders which have contaminated the shoes. I think that NAPA can have the parts by tuesday night. They want about $45 for the shoes(4) and about $45 for the wheel cylinders (2).
I have been able to borrow a vacuum bleeder (wonderful tool) in the past, but I think I might have to come up with my own system. The two person bleed is tiresome (me under car "Down...UP...Down..Is the pedal down?"). Anyone tried the bleeder hoses with a little check valve in the end?
Byron
Byron

82 Datsun 720 KC SD22

MPG Machine
Dave S
Posts: 13
Joined: 18 years ago
Location: Seal Rock, Oregon
Contact:

Brake bleeders

#20

Post by Dave S »

Byron-
I've used vacuum bleeders, (ughh!), helping friends, (umm, ok), hoses with valves, (not bad, for the price!), and a lo-buck(<$75) pressure bleeder.

I never had ANY luck with the vacuum bleeder I bought. The adapters would never really seal well enough to do a good job, at least for the amount of patience I had back then.

The pressure bleeder is my favorite, large container, can do all four whilst under the car.

The hose with valve required creative adaption of catch container, the one I had came with a short-ish hose.

The trick for me with the one man bleeder line was to remember to not let the reservoir run dry!

For $10 or so, I'd give the hose with valve a try.

May it go smoothly,
Dave
User avatar
asavage
Site Admin
Posts: 5434
Joined: 18 years ago
Location: Oak Harbor, Wash.
Has thanked: 1 time
Contact:

#21

Post by asavage »

moose60 wrote:I have leaky wheel cylinders . . .
I get to be right again ;)

On bleeding brakes: I own the large Mity-Vac with the brake bleeding adapters and I still prefer to use something else. As Dave mentioned, with the bleeder screw loosened even slightly, you pull air around the threads and you can't really tell when you're done bleeding.

While I'm going to catch some flak for saying so, you don't really need any special equipment to bleed these old rigs, and you can do it by yourself. See the lower left pic and paragraph on this FalconFAQ page (another of my sites, one that has languished unattended for a while now).

Oh, the color of the brake fluid in that pic? It's DOT5 so it's dyed purple. DOT3/4 should be clear! If you're not using DOT5 and your brake fluid is dark, it's absorbed moisture and should be flushed until it's clear.
Regards,
Al S.

1982 Maxima diesel wagon, 2nd & 4th owner, 165k miles, rusty & burgundy/grey. Purchased 1996, SOLD 16Feb10
1983 Maxima diesel wagon, 199k miles, rusty, light yellow/light brown. SOLD 14Jul07
1981 720 SD22 (scrapped 04Sep07)
1983 Sentra CD17, 255k, bought 06Jul08, gave it away 22Jun10.
redmondjp
Posts: 204
Joined: 18 years ago
Location: Redmond, WA

#22

Post by redmondjp »

I'm with you, Al--you don't need any special equipment at all to bleed these older vehicles--if you have the patience. I have been using the 1-man gravity-bleed method for many years now. First I suck all of the old fluid out of master cylinder reservoir (turkey baster) and then refill with clean fluid, periodically checking this level and topping off while bleeding. Then I connect a long, clear hose to each bleeder screw and clip the bottom of the hose to a container at the bottom (clear glass jars work great). I like to use clear hose and jars as I can see the color of the brake fluid coming out, as well as to check the hoses for bubbles. Then I open up each of the bleeder screws and allow the fluid to drip out. This is where the patience comes into play, as it can take an hour or so to do this. I am usually trying to flush all of the old fluid out of the lines as well, so I utilize the clear jars to see when I have clean fluid flowing out of each corner of the vehicle.

I usually have somebody come out (my wife :) ) and do the pedal-bleed at the end of this procedure, and 99% of the time I don't get any additional air out. So this convinces me that the gravity-bleed method does indeed work, at least for older non-ABS-equipped vehicles. One key to doing brake work is to not let air get into the system in the first place, and this is not hard to do if one thinks before opening up the system.

If you're replacing the master cylinder--keep all of the bleeders closed and all the fluid will stay in place in the lines. Then bench-bleed the master, and bleed the remaining air out right at the lines connecting to the master. Boom. You're done--no need to bleed each corner (the pros do this, as it saves a lot of time). If you're removing a wheel cylinder or caliper line--use a short piece of vacuum line with a BB inside to seal off the steel brake line to keep the fluid from leaking out while the line is disconnected (or let it drain out if you're flushing the lines, so you don't fill your new/rebuilt caliper or wheel cylinder with old, dirty fluid).

Let me address an issue mentioned above--air leaking in around the bleeder screw threads--it does happen and it can easily be stopped. Simply remove the bleeder screws (you may want to clean them up with a wire brush/wheel while you have them out, and use a wire to clean the crud out of the inside passages), apply anti-sieze grease to the threads and reinstall. This seals out the air, and also keeps the bleeder screws from siezing in place. I've been fooled more than once by air bubbles which were actually from air leaking in around the bleeders, and not air from inside the system!
:D
1982 Datsun 720 King Cab, SD22, 86K miles (sold)
1981 Rabbit LS 4-door, 1.6D, 130K miles (sold)
1996 Passat TDI 4-door sedan, 197K miles
User avatar
philip
Deceased
Posts: 1494
Joined: 18 years ago
Location: Southern California, USA

Re: Brake bleeders

#23

Post by philip »

Dave S wrote: I never had ANY luck with the vacuum bleeder I bought. The adapters would never really seal well enough to do a good job, at least for the amount of patience I had back then. Dave
The "trick" to using a MityVac as a bleeder is:

Fill the reservoir.

Remove the bleeder bolt entirely.

Use one of the plastic tapered hose tips included with the MityVac and insert it firmly into the bleeder hole ... past the threads to the seat.

Bleed away, watching the clear vinyl line to the cup for air bubbles, MINDFUL not to suction all the fluid out of the reservoir!

When satisfied (and reservoir is refilled), withdraw the tapered tip and quickly reinstall the bleeder bolt ... while brake fluid continues to flow out under gravity from the reservoir.
Last edited by philip 17 years ago, edited 1 time in total.
-Philip
Passed 08May2008
My friend, you are missed . . .

1982 Datsun 720KC SD-22

"Im slow and I'm ahead of you"
moose60
Posts: 168
Joined: 18 years ago
Location: Seattle WA

#24

Post by moose60 »

When I showed up at NAPA today to get all the parts, they handed me wheel cylinders and brake pads. I was hoping for brake shoes... On the re-order the shoes missed the last truck of the day, so I'll wait till tomorrow.
One of the drums (right side) is somewhat scored and the drum removal threads are stripped (not me), so I will replace that drum. Also on the same side, I'm missing the e-brake rod.
Things on the left side look good drum-wise.

Redmond-
I have tried the gravity bleed in the past, but it has not seemed to work well for me. I also use a similar technique on the leaky bleeder nipples.

The more I crawl around under the truck the more I find...
B
Byron

82 Datsun 720 KC SD22

MPG Machine
User avatar
asavage
Site Admin
Posts: 5434
Joined: 18 years ago
Location: Oak Harbor, Wash.
Has thanked: 1 time
Contact:

Re: Brake bleeders

#25

Post by asavage »

philip wrote:The "trick" to using a MityVac as a bleeder is:

Use one of the plastic tapered hose tips included with the MityVac . . .
I don't have the small, hand-held Mity-Vac, I've got the four-quart model, and then I ordered the brake-bleeding accessory kit for add'l cost. I don't recall seeing plastic threaded adapters, but they may be there and I don't recall them. I'll have to go dig out the kit.
redmondjp wrote:I have been using the 1-man gravity-bleed method for many years now.
I don't gravity bleed. What I wrote on the FalconFAQ site was, ". . . and watch the tubing for the absence of bubbles, while operating the brake pedal."

IOW, I submerge the line in the jar (see the picture, the jar is above the wheel cylinder) and then short-stroke the brake pedal. Air is not drawn back in, unless you let the brake pedal up fast.
Regards,
Al S.

1982 Maxima diesel wagon, 2nd & 4th owner, 165k miles, rusty & burgundy/grey. Purchased 1996, SOLD 16Feb10
1983 Maxima diesel wagon, 199k miles, rusty, light yellow/light brown. SOLD 14Jul07
1981 720 SD22 (scrapped 04Sep07)
1983 Sentra CD17, 255k, bought 06Jul08, gave it away 22Jun10.
User avatar
philip
Deceased
Posts: 1494
Joined: 18 years ago
Location: Southern California, USA

Re: Brake bleeders

#26

Post by philip »

asavage wrote: I don't recall seeing plastic threaded adapters, but they may be there and I don't recall them. I'll have to go dig out the kit
The tapered tips I speak of simply push into the clear vinyl MityVac hose on one end while the tapered end is unthreaded ... smooth. You simply want to achieve a seal between the tapered tip and the tapered seat at the bottom of the threaded bore in the wheel cyl / caliper. There is nothing "threaded" about these adaptors :)
-Philip
Passed 08May2008
My friend, you are missed . . .

1982 Datsun 720KC SD-22

"Im slow and I'm ahead of you"
ocd
Posts: 69
Joined: 18 years ago
Location: Portland, OR

#27

Post by ocd »

i like the speed bleeders. they have a pressure valve that opens when you press the peddle and closes when you let pressure off. just replace all four bleeders with the speedy ones -crack 'em open and attach a hose fed into a container and pump away keepin your eye on the resevoir -tighten them all back up and your done -15 mins max. they cost about $20/pair
-Noah

i deliver blends of biodiesel -no more!.

82 datsun 720 KC w/sd22
85 volvo 760gle sedan turbo diesel
85 peugeot 505s wagon turbo diesel & parts car
83 chevy k20 suburban silverado 6.2 n/a diesel
moose60
Posts: 168
Joined: 18 years ago
Location: Seattle WA

#28

Post by moose60 »

I think that the power outage ate a couple of my most recent posts.

I've got the truck back together and the brakes seem to work alot better. I have only had time to drive it around the neighborhood making lots of stops. I think that the rears may still lock up first, but it's much harder to do. Everything went pretty well, but getting the springs back on is tough. Any tips for the next time (5 years from now, I hope) guys?

Can someone educate me about the sliding nature of the brake adjusters on these trucks? My previous experience with brakes has been with aircooled VWs. They have an adjuster which is fixed to the backing plate. Is the advantage of the Nissan design that it needs only one adjusting star per wheel? (did my VWs have two adjusters per wheel? It's been a while.)

If anybody has an extra e-brake link rod (actuating rod/shoe link etc.), I need one for the right rear.

Al and Philip-
I lubed all the points called for in the FSM. :wink:
Byron

82 Datsun 720 KC SD22

MPG Machine
User avatar
asavage
Site Admin
Posts: 5434
Joined: 18 years ago
Location: Oak Harbor, Wash.
Has thanked: 1 time
Contact:

#29

Post by asavage »

There are two essential tools for older brake service.

Image
This pic does not show off the tool's utility, but IMO it's absolutely essential. I'll never use "brake spring pliers" again. When I used one of these in 1978, I immediately ran down a Snap-On dealer's truck and bought myself one. Best $25 I've ever spent.

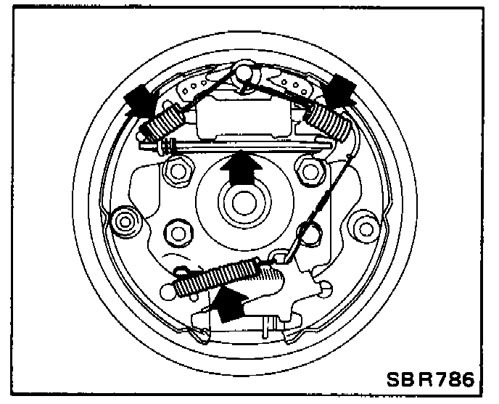
The belled end is hollow and slips over the brake return spring post. It has a small hooked lip that can't be seen in that pic. Slide it over the spring post up to the spring, rotate tool 180°, spring is now hooked on the tool's bell and not the post. Carefully lever the tool, and the spring slides up the tool's shank. Easy to remove the return springs.

To reinstall the spring, use the other end, which has a hook to catch the spring post. Put spring on tool's shank, put hooked end of tool on post, lever the tool to stretch and slide the spring down the shank onto the post. You won't believe how easy it is.

For the hold-down springs, leave your pliers behind! Use one of these:
Image
The inside of the cupped portion is serrated and holds that spring retainer/washer well. Much better than pliers.

Both tools shown are Snap-On, but there are many clones of these products that are made in China and are much cheaper and probably work as well.
Regards,
Al S.

1982 Maxima diesel wagon, 2nd & 4th owner, 165k miles, rusty & burgundy/grey. Purchased 1996, SOLD 16Feb10
1983 Maxima diesel wagon, 199k miles, rusty, light yellow/light brown. SOLD 14Jul07
1981 720 SD22 (scrapped 04Sep07)
1983 Sentra CD17, 255k, bought 06Jul08, gave it away 22Jun10.
User avatar
philip
Deceased
Posts: 1494
Joined: 18 years ago
Location: Southern California, USA

#30

Post by philip »

moose60 wrote:SNIP Can someone educate me about the sliding nature of the brake adjusters on these trucks?
(Starting in mid 1983)

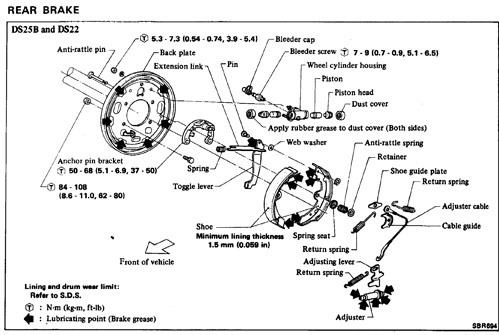
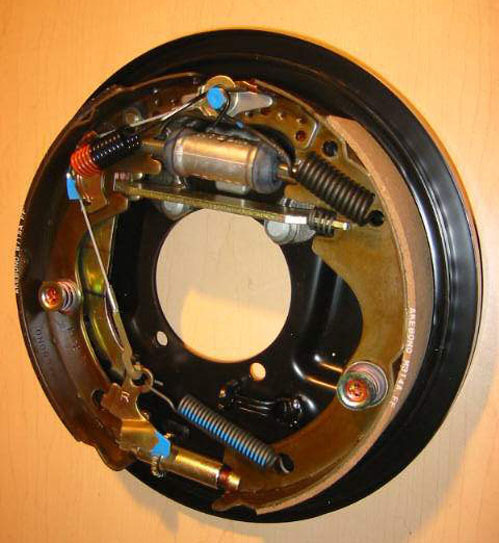
The forward shoe (primary) has a shorter lining than the rear (secondary) shoe.

The primary shoe is applied by wheel cylinder force on one end and by force transferred from the wheel cylinder through the secondary shoe to the other end of the primary shoe.

The secondary shoe is applied by the same two forces AND the force generated by directional rotation of the drum. This additional force necessitates the longer brake lining to balance wear rate with the primary shoe. Still, you will find the secondary shoe wearing faster.

The slack adjuster does adjust the shoe/drum clearance of both shoes simultaneously.

Image

Image

Image

RIGHT SIDE
Last edited by philip 16 years ago, edited 5 times in total.
-Philip
Passed 08May2008
My friend, you are missed . . .

1982 Datsun 720KC SD-22

"Im slow and I'm ahead of you"
Post Reply

Who is online

Users browsing this forum: No registered users and 1 guest