Symptom: various things have power (dome lights, headlights, Talking Lady, brake lights) but the key either
- Doesn't do anything, or
- Will turn on dash lights, but won't crank starter.
To test for this, unscrew the lower plastic housing around the Ign switch.
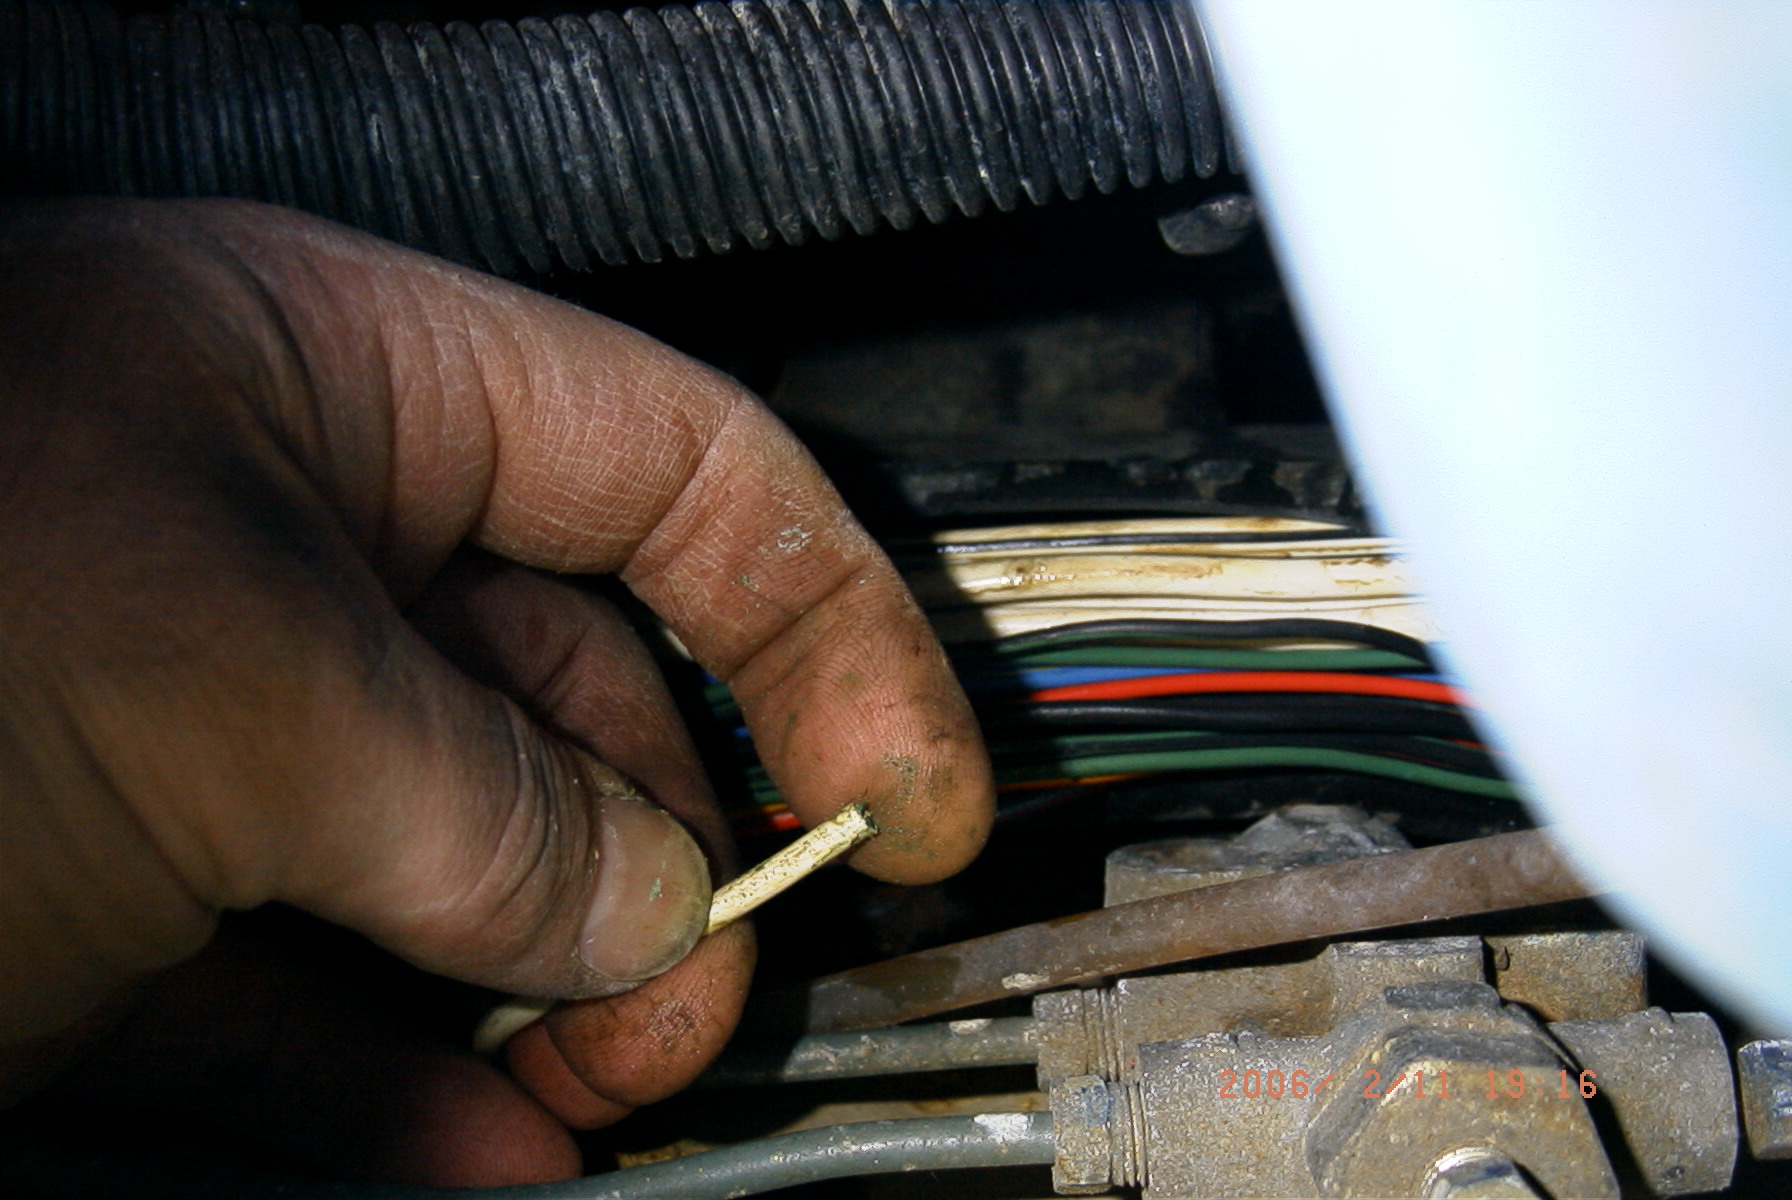
Check the voltage at the white wire on the back of the Ign switch, with the harness plugged in to the switch and the switch in the "ON" position. You can use a straightened paper clip to probe the back of the connector. With the key "OFF", you may see battery voltage but with the key "ON" the voltage will disapper or it'll be a lot lower. If so, you have the same problem I had: insufficient power to the switch, due to a break in the main wiring harness.
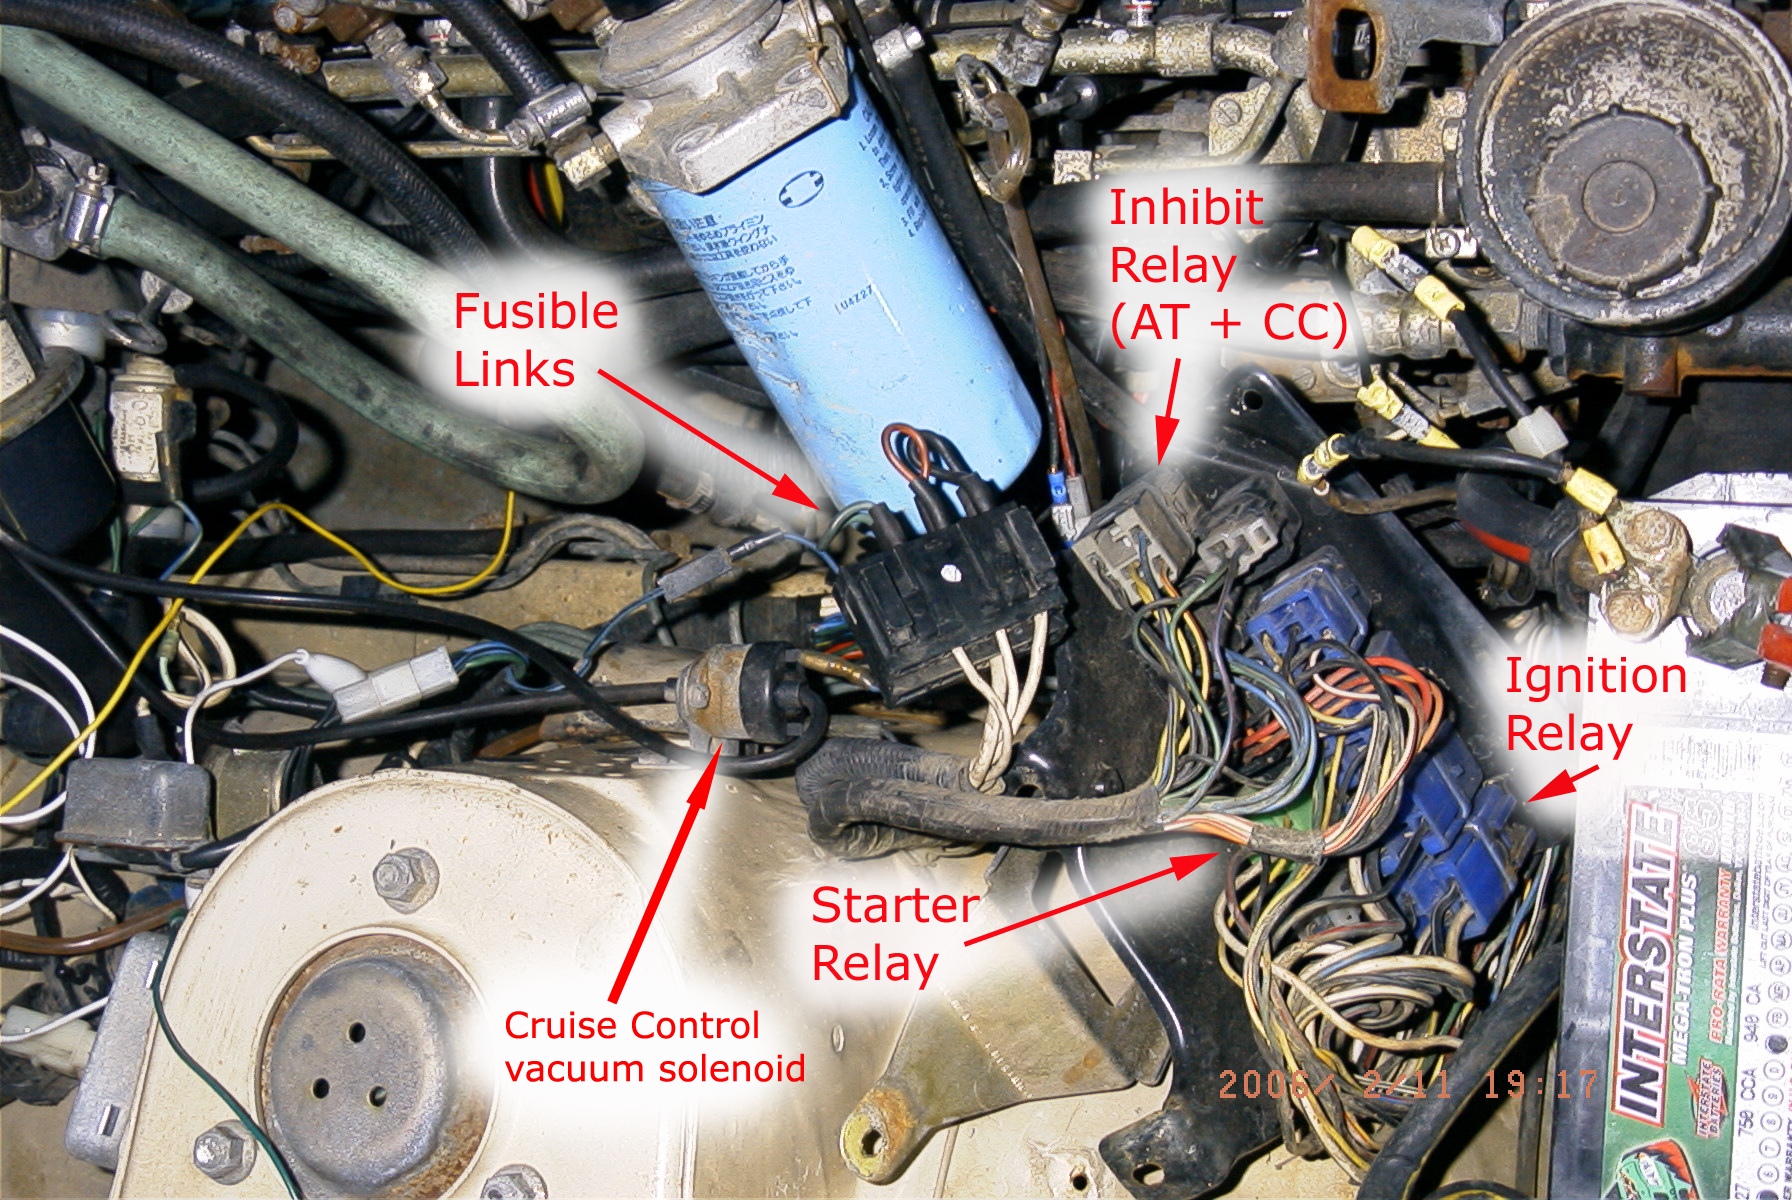
It's not exactly obvious from the schematic, but there are some splices inside the harness. I found that one of them is badly corroded, and another completely eaten away -- the cause of the problem. The following pics are the section of the engine compartment harness directly to the rear of the battery, up to the relay panel, and under the fuel filter.
Bird's Eye View (click on image for larger):
Corroded junction:
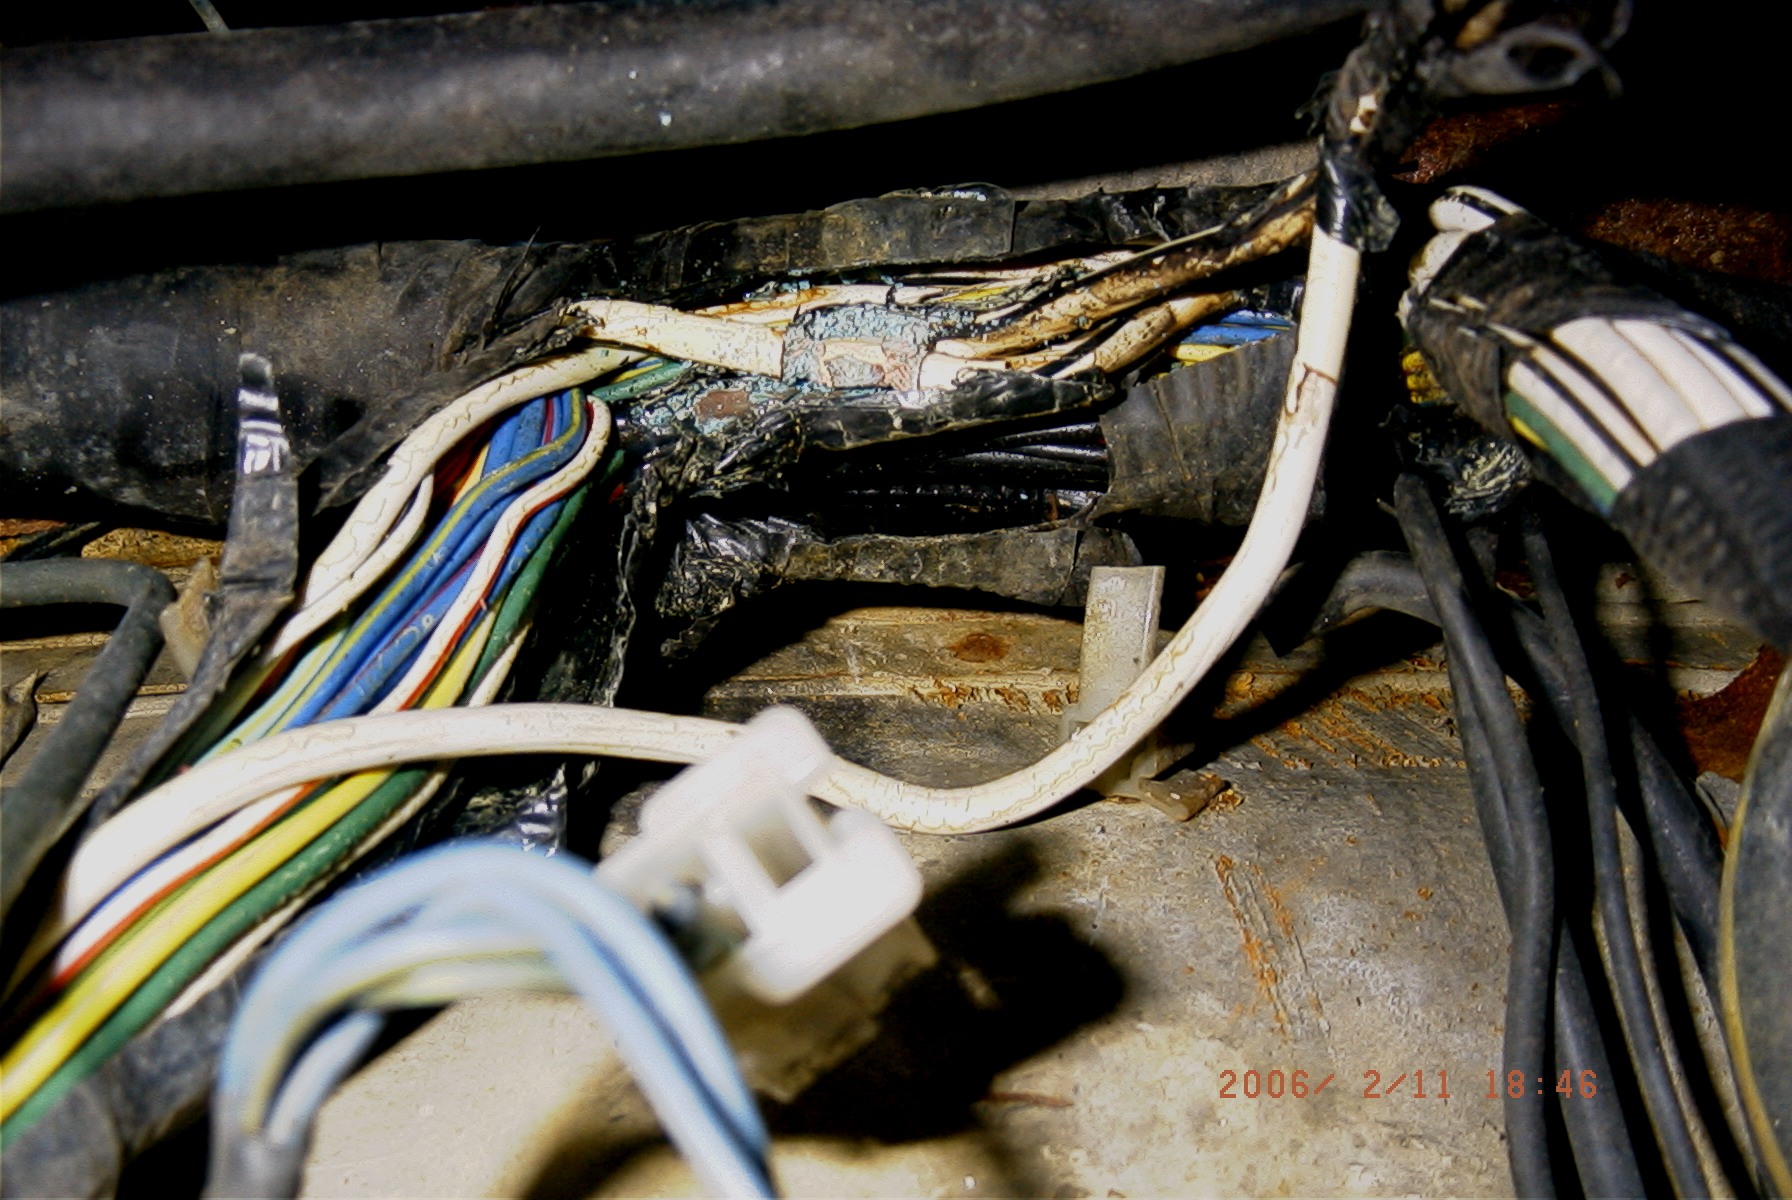
Two wires of a three-way junction:

Inside the tape:

The third wire for that junction, buried in the wiring harness directly under the fuel filter (tied off to the side in this pic):
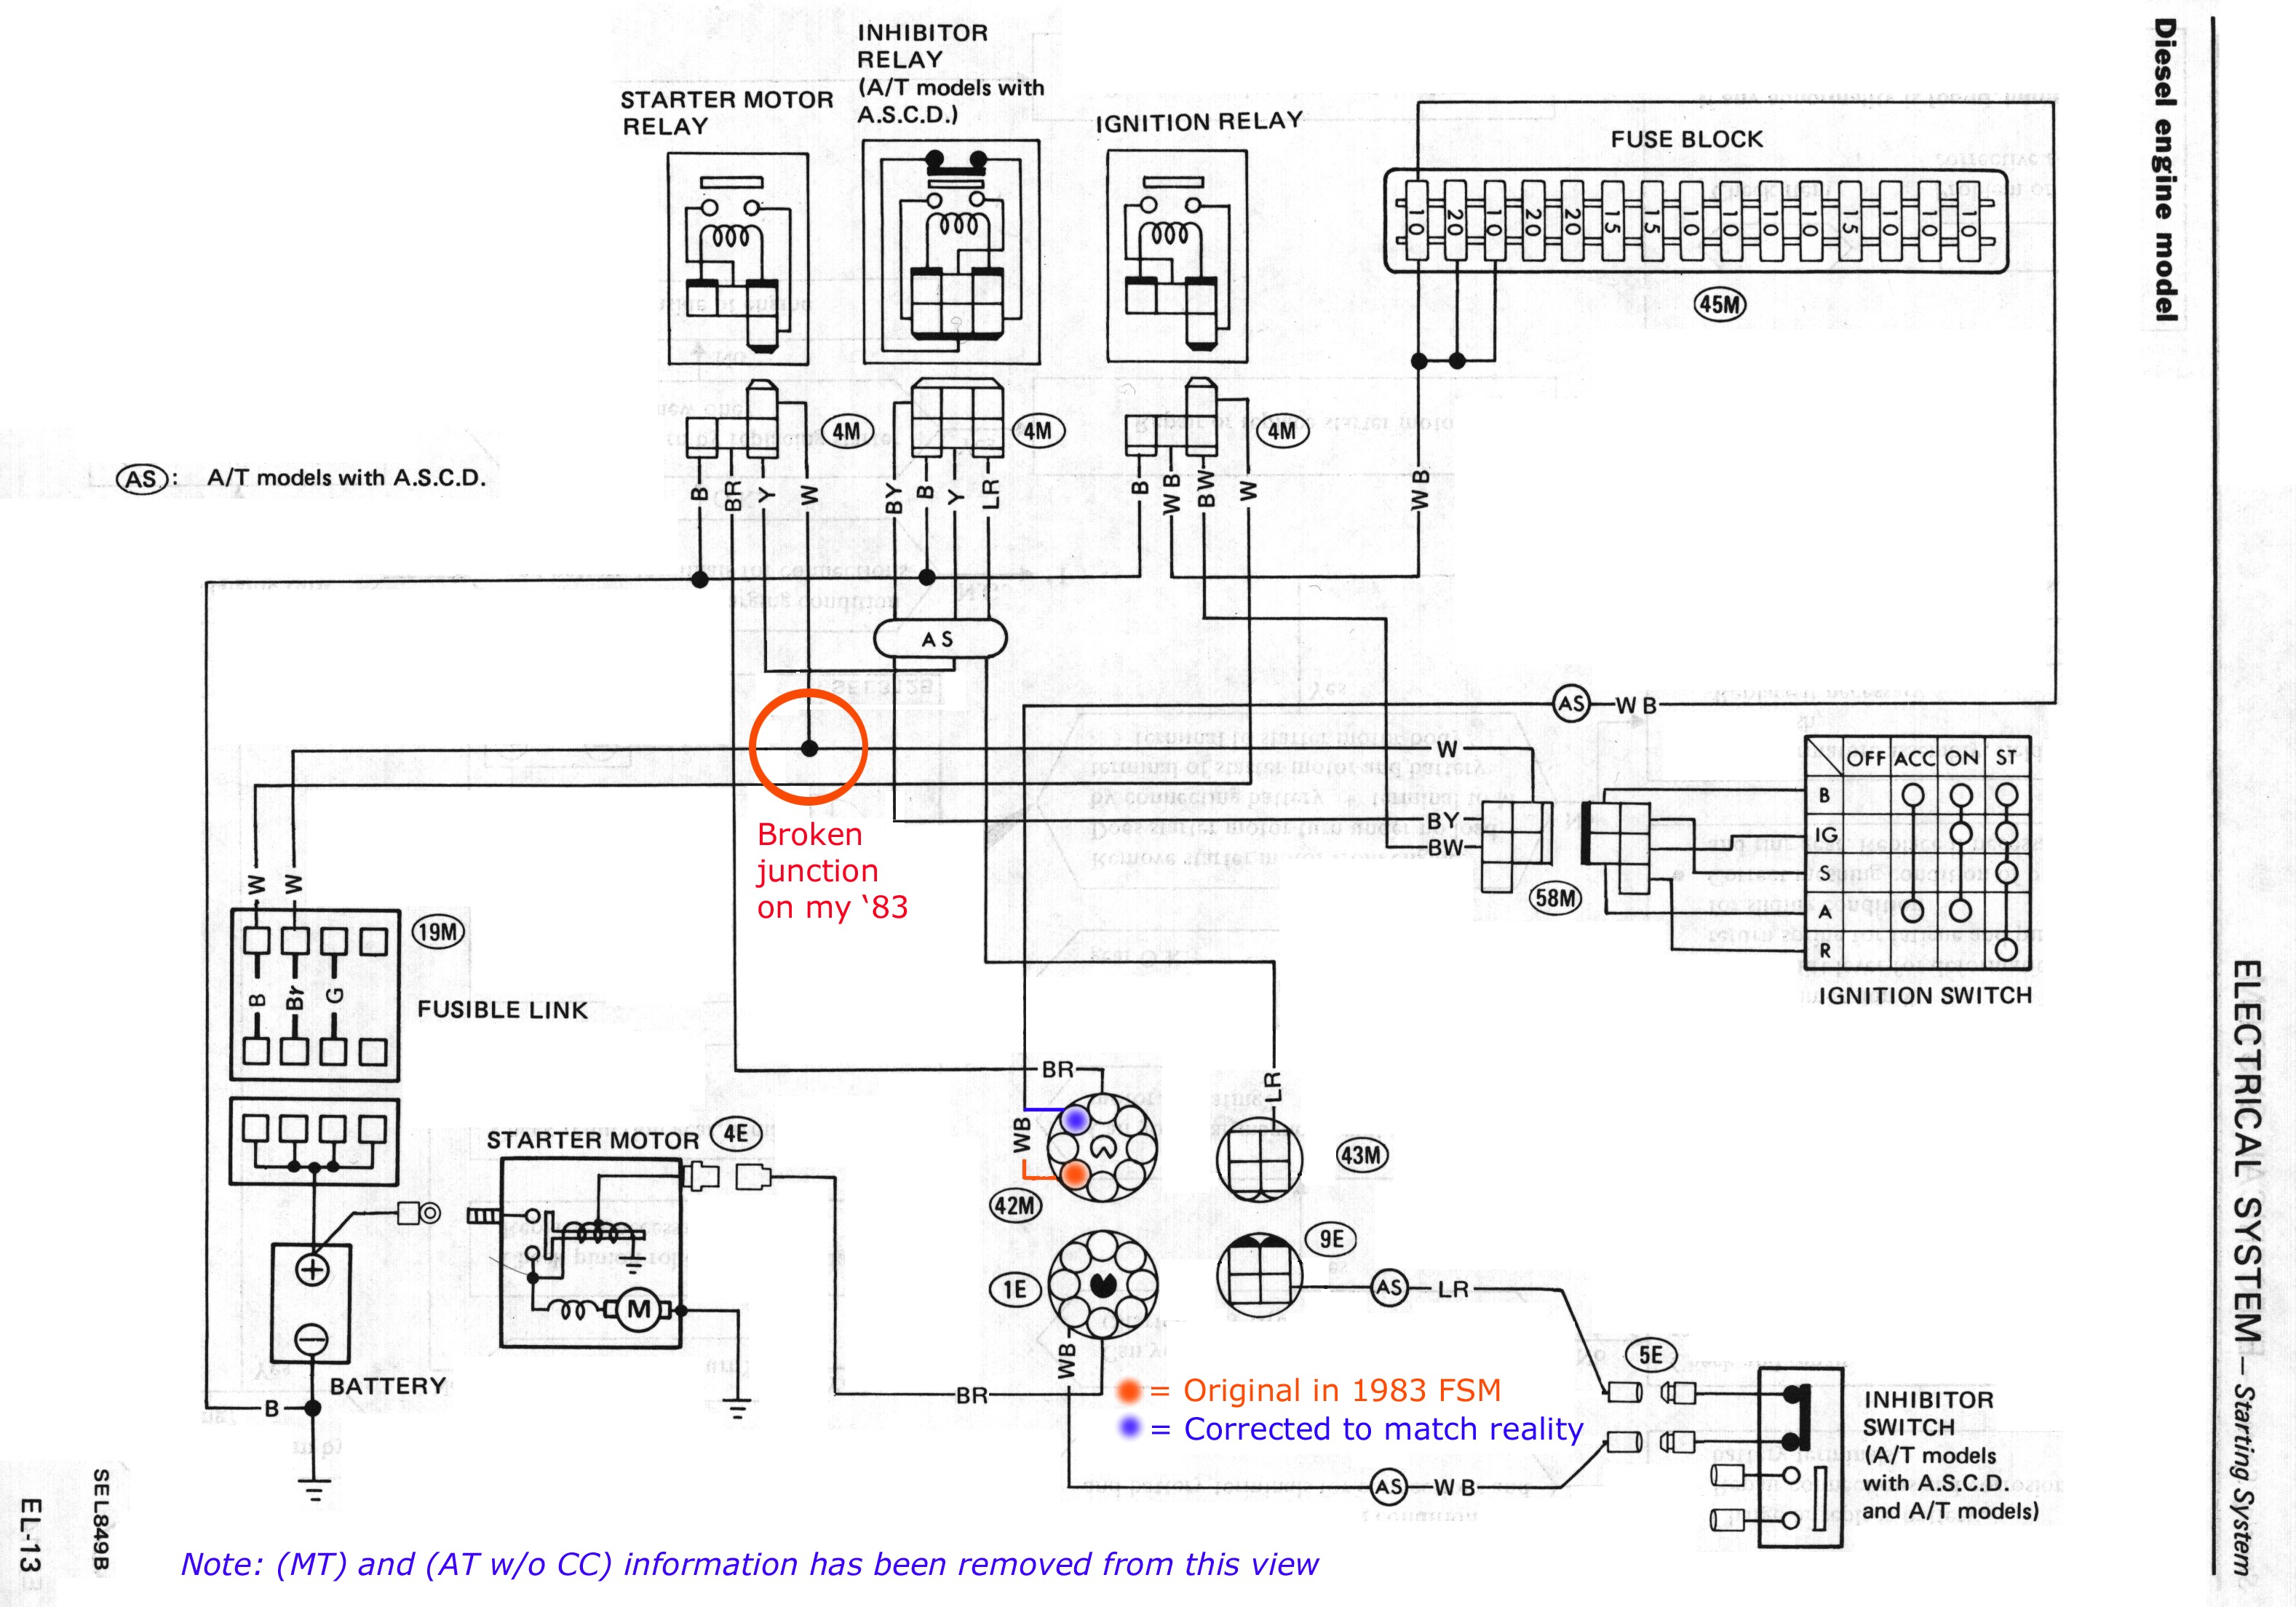
What those wires do:
Interestingly, I found at least three discrepancies between the 1983 FSM and reality:
a) Location of relays in the panel is different than the FSM. I suppose that someone might have possibly moved them around in the past.
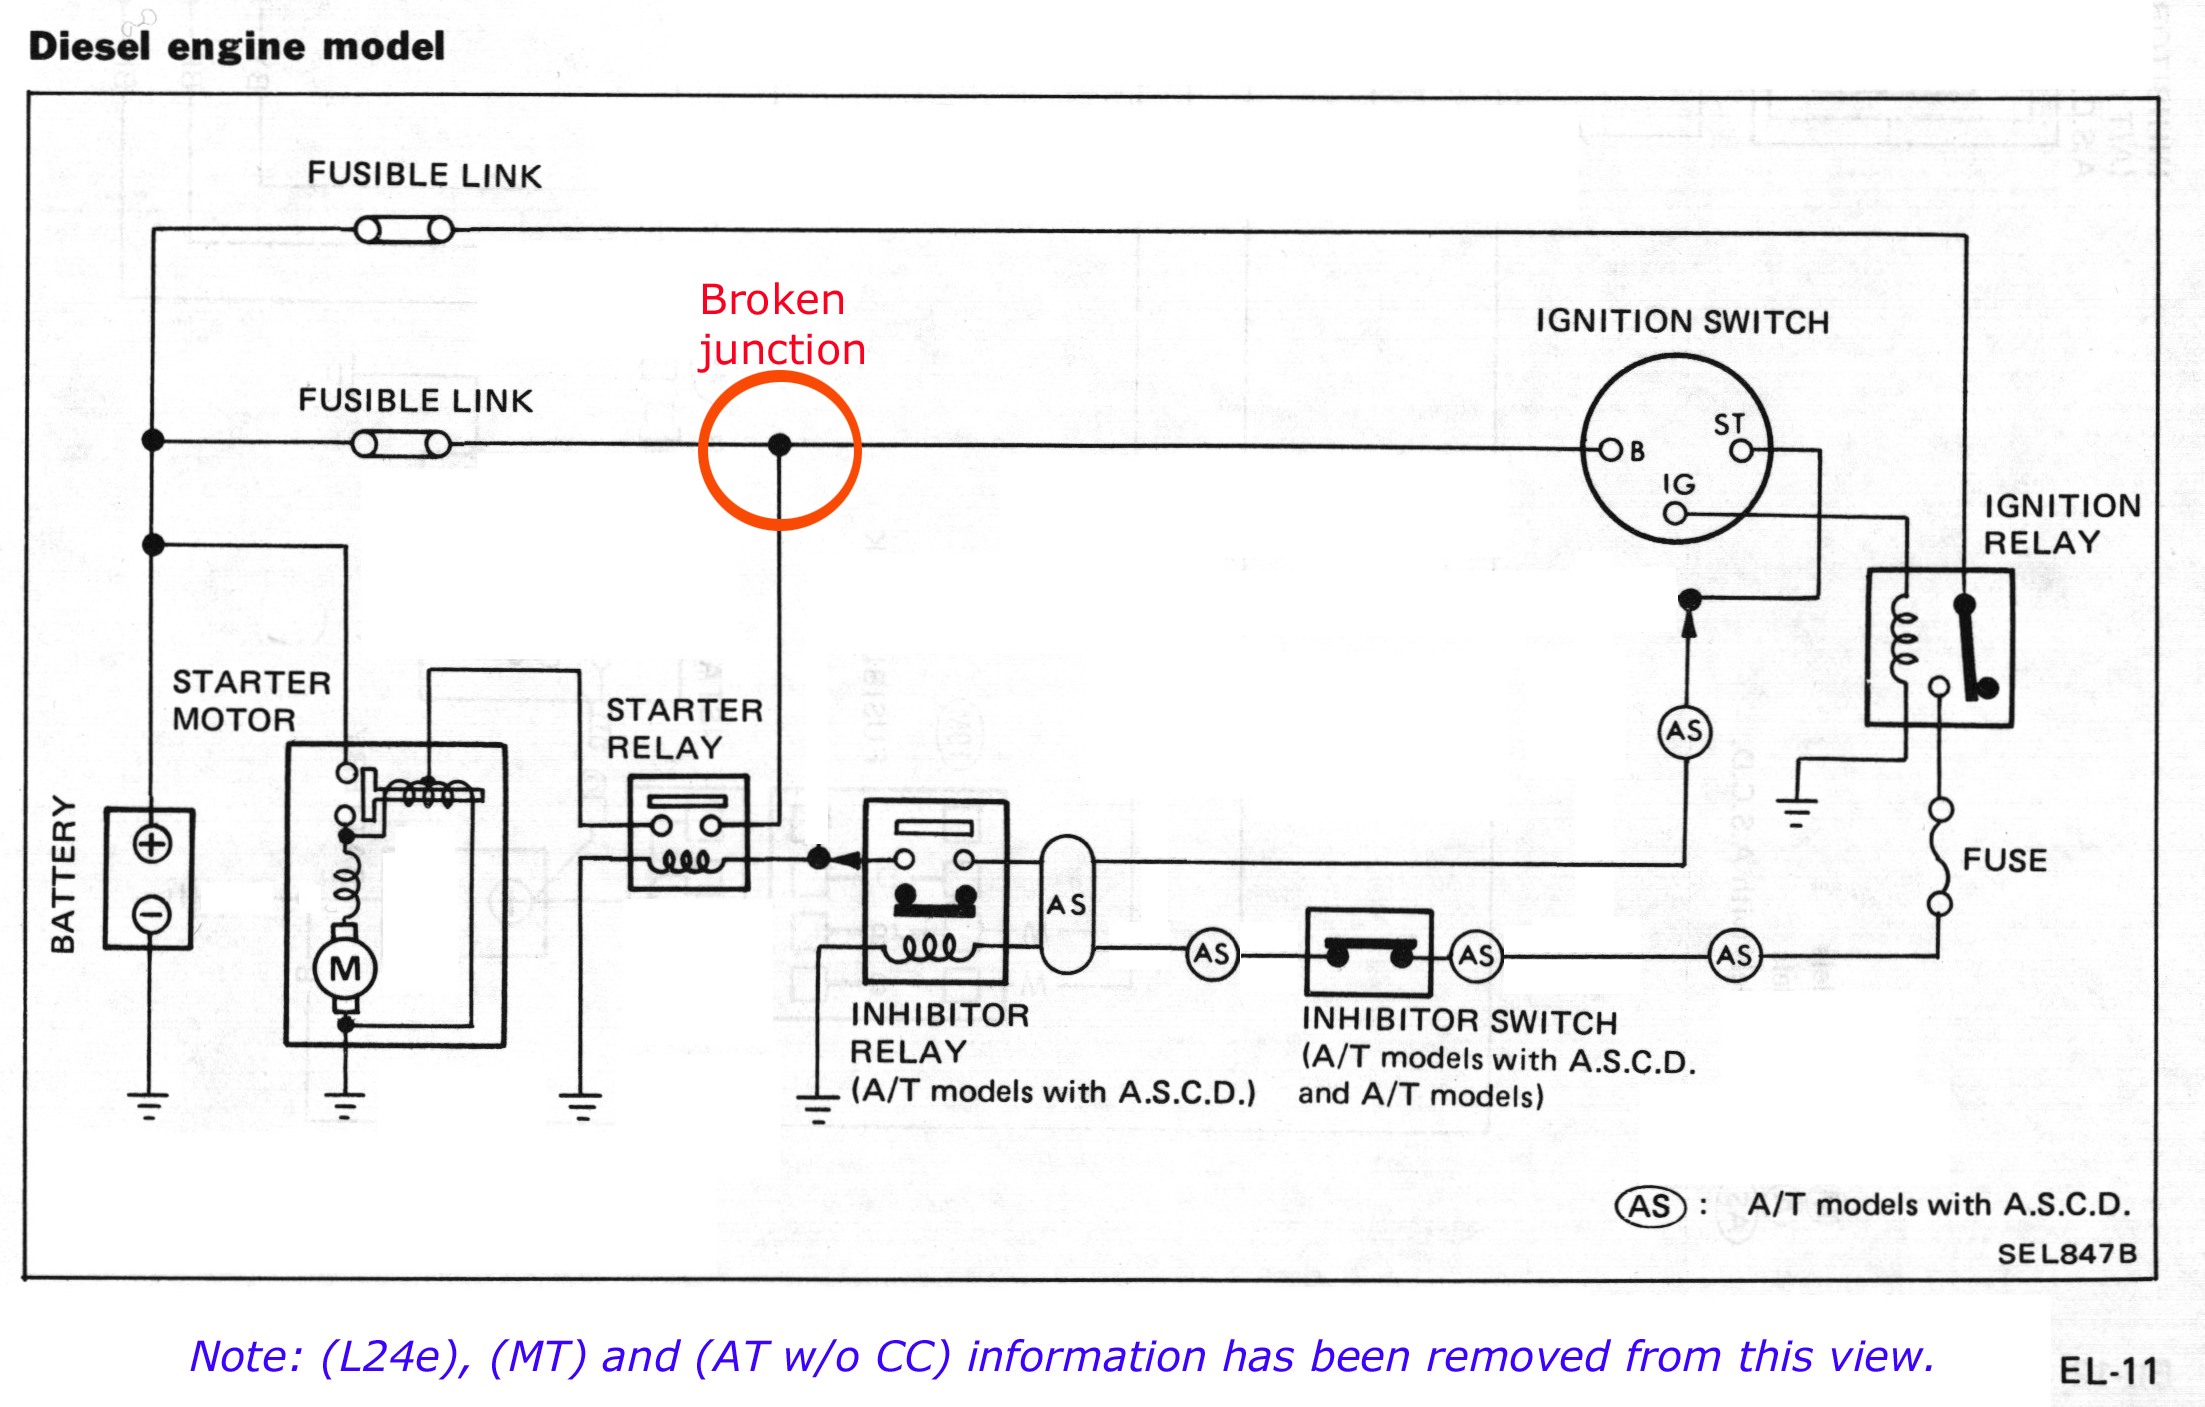
b) The wrong fusible link is shown for that junction. FSM indicates the center fusible link (Brown), but my center fusible link is Red, and the one feeding the bad junction is Green.
c) See the diagram below: the Black w/Red wire on the circular connector does not show mating correctly. I'll have to look at my harness again to check which is the correct location, but as shown below they wouldn't connect.
I repaired mine using some White 12ga wire and soldering those three wires back together with about an extra 12", and using some new loom material of the appropriate diameter.
The section under the fuel filter has a heavier sheath, and I merely split the top of it to access the junction. I used multiple nylon zip ties to re-wrap that sheathing later, because commercial loom material is difficult to work with in that area.
The wire was corroded several inches up into the insulation on all three wires. There are at least two of these three-way junctions in that area; only the one was really bad, the other one is still in decent condition. There are several more in the section of harness leading up to the relays panel, and those are all in good condition.
[later, in reply to Carimbo]
You need to cut the top of the main harness from just behind the fuel filter area to the branch that goes up to the relays & fusilble links, about 8" total. Use a sharp utility knife and just split the top of the harness. You have to unbolt the fuel filter and bailing-wire it toward the engine (leaving its hoses connected). At least I did. You really need to split the entire harness top, because you can't dig around in there with only a 3" hole. And unless you're a better person than I, you can't solder the three wires well down there. For one thing, you'll find that the wires themselves are corroded a couple of inches up, so you'll be pruning them back. I put in about 14" of extra 12ga wire, and tackled the repair that way, then folded the excess back into the loom when I zip-tied the loom back over the wires.
After soldering, I used silicone sealant over the soldered junction, then shrink-wrapped over that. Messy but waterproof.
Knowing where to cut and repair is the hard work, the actual repair isn't that bad. Unless you haven't taken your car to a car wash recently -- I keep my engine bays pretty clean, and that's an easy area of the bay to wash at a do-it-yourself car wash, prior to working on it. Just don't get carried away at directing pressurized water at the underside of the relays panel.
Any grease/dirt you remove via the car wash or other method, is grease/dirt you won't be wearing and trying to get out of your clothing when you do the repair..
I wonder how many of the dead diesel Maximas in junkyards are there because of shredded IP belts and this corroded wire harness junction?
[later still]
After re-reading the above, I can see that one picture is misleading. Take a look at this again:
Corroded junction (click on image for larger):
It's not clear . . . but that is not the junction that was giving me trouble. The one shown is badly corroded but stil intact, and all I did was clean it of green corrosion. I still need to seal it, but it is conducting OK and I'm leaving that sleeping dog lie. That pic is with the the WW reservoir removed, and the relay panel unscrewed and pulled out of the way (to the lower left of the pic). The junction shown there is between the riser harness to the relays (colored wires on the left of pic), and the battery (just out of the pic's frame, to the right). The problem junction is further left, and I cut/split open the top of more of the black harness loom that you see running off to the left.
IOW, you will have to
- Remove the loom from the riser harness to the relays (to get enough "good" wire to splice to the starter relay);
- Remove the loom toward the battery (to get enough "good" wire to splice to the fusible link);
- Remove the loom along the frame rail under the fuel filter and brake valve junction (to splice to get enough "good" wire to splice to the wire to the Ign. switch).

