I suspect they are there to tighten up, and expand, as the manifold bolts and washers heat up and try to loosen, they are sort of spring washer. I found some thin ones today in the motormite (sp?) HELP section in an exhaust bolt hardware kit, so those guys might have them. If I can find some thinner ones by them selves I could do as Al suggests and just stack them.asavage wrote:It's a kind of half-ass Belleville washer, and I've only seen them elsewhere on old straight-Six manifolds. I have never seen them at a parts store.
My hardware store caries GR8 flat washers. For a substitute, I'd stack maybe three of those up under your new nut. They won't stay GR8 for long at exhaust manifold temps, but will set in a nice, stiff stack anyway. And I'd put a split lock washer in there too.
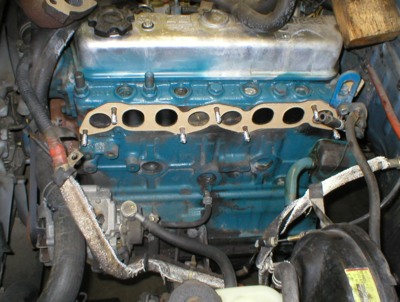
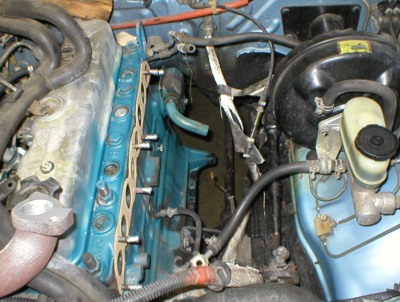
Rusted exhaust studs!!!
Moderators: plenzen, Nissan_Ranger
-
ecomike

- Posts: 242
- Joined: 19 years ago
- Location: Houston Tx
Regards,
Mike
1985 Jeep Cherokee Pioneer, 2WD, retrofitted with SD-22 & 5 spd manual trans, a 4X4 Gas Wagoneer ltd. (XJ) Jeep, 4.0 L w/ AW4 auto, and now 2 spare 2wd Jeeps, 87 & 89.
Mike
1985 Jeep Cherokee Pioneer, 2WD, retrofitted with SD-22 & 5 spd manual trans, a 4X4 Gas Wagoneer ltd. (XJ) Jeep, 4.0 L w/ AW4 auto, and now 2 spare 2wd Jeeps, 87 & 89.
-
asavage

- Site Admin
- Posts: 5452
- Joined: 19 years ago
- Location: Oak Harbor, Wash.
- Has thanked: 2 times
- Been thanked: 3 times
- Contact:
Belleville washers can be paralleled, not problem there. Problem is finding one or more the correct size.
Can't use an impact wrench on u-joints, unless you use a special impact u-joint (which I haven't see in 3/8", but that doesn't mean it doesn't exist).
If you can't get it off with hand tools, I do not recommend trying an impact wrench. They're quite dangerous with any kind of extension anyway, and add a u-joint into it . . . scary. I could tell you stories . . .

If you can get a 1/4" drive 12mm socket on it, you should be able to get a 3/8" socket there. If so, I'd consider a 24" or 36" extension to get you out of the way of all the other bits, and a 3/8" breaker bar. Apply torque until something breaks. Do not use a $6 u-joint, get a good one. Low end for this job would be at least a Craftsman u-joint, no Allied or SuperTech or PowrKraft or any of that crap. The u-joint will be the weak link in your torque chain.
If you have to use a 1/4" drive socket, the adapter will just shear off when you apply more torque, not even a high-end adapter can hold up in that situation.
If what breaks isn't the nut coming off the stud . . . well, I really would use heat next. Propane on a wand. A piece of construction flashing slipped behind the work area to keep "overspray" heat from discoloring the firewall etc.
Last resort: I would Dremel-on-a-wand the nut off and replace the stud later. But I'd have to exhaust the other methods first.
Can't use an impact wrench on u-joints, unless you use a special impact u-joint (which I haven't see in 3/8", but that doesn't mean it doesn't exist).
If you can't get it off with hand tools, I do not recommend trying an impact wrench. They're quite dangerous with any kind of extension anyway, and add a u-joint into it . . . scary. I could tell you stories . . .


If you can get a 1/4" drive 12mm socket on it, you should be able to get a 3/8" socket there. If so, I'd consider a 24" or 36" extension to get you out of the way of all the other bits, and a 3/8" breaker bar. Apply torque until something breaks. Do not use a $6 u-joint, get a good one. Low end for this job would be at least a Craftsman u-joint, no Allied or SuperTech or PowrKraft or any of that crap. The u-joint will be the weak link in your torque chain.
If you have to use a 1/4" drive socket, the adapter will just shear off when you apply more torque, not even a high-end adapter can hold up in that situation.
If what breaks isn't the nut coming off the stud . . . well, I really would use heat next. Propane on a wand. A piece of construction flashing slipped behind the work area to keep "overspray" heat from discoloring the firewall etc.
Last resort: I would Dremel-on-a-wand the nut off and replace the stud later. But I'd have to exhaust the other methods first.
Regards,
Al S.
1982 Maxima diesel wagon, 2nd & 4th owner, 165k miles, rusty & burgundy/grey. Purchased 1996, SOLD 16Feb10
1983 Maxima diesel wagon, 199k miles, rusty, light yellow/light brown. SOLD 14Jul07
1981 720 SD22 (scrapped 04Sep07)
1983 Sentra CD17, 255k, bought 06Jul08, gave it away 22Jun10.
Al S.
1982 Maxima diesel wagon, 2nd & 4th owner, 165k miles, rusty & burgundy/grey. Purchased 1996, SOLD 16Feb10
1983 Maxima diesel wagon, 199k miles, rusty, light yellow/light brown. SOLD 14Jul07
1981 720 SD22 (scrapped 04Sep07)
1983 Sentra CD17, 255k, bought 06Jul08, gave it away 22Jun10.
-
ecomike
- Posts: 242
- Joined: 19 years ago
- Location: Houston Tx
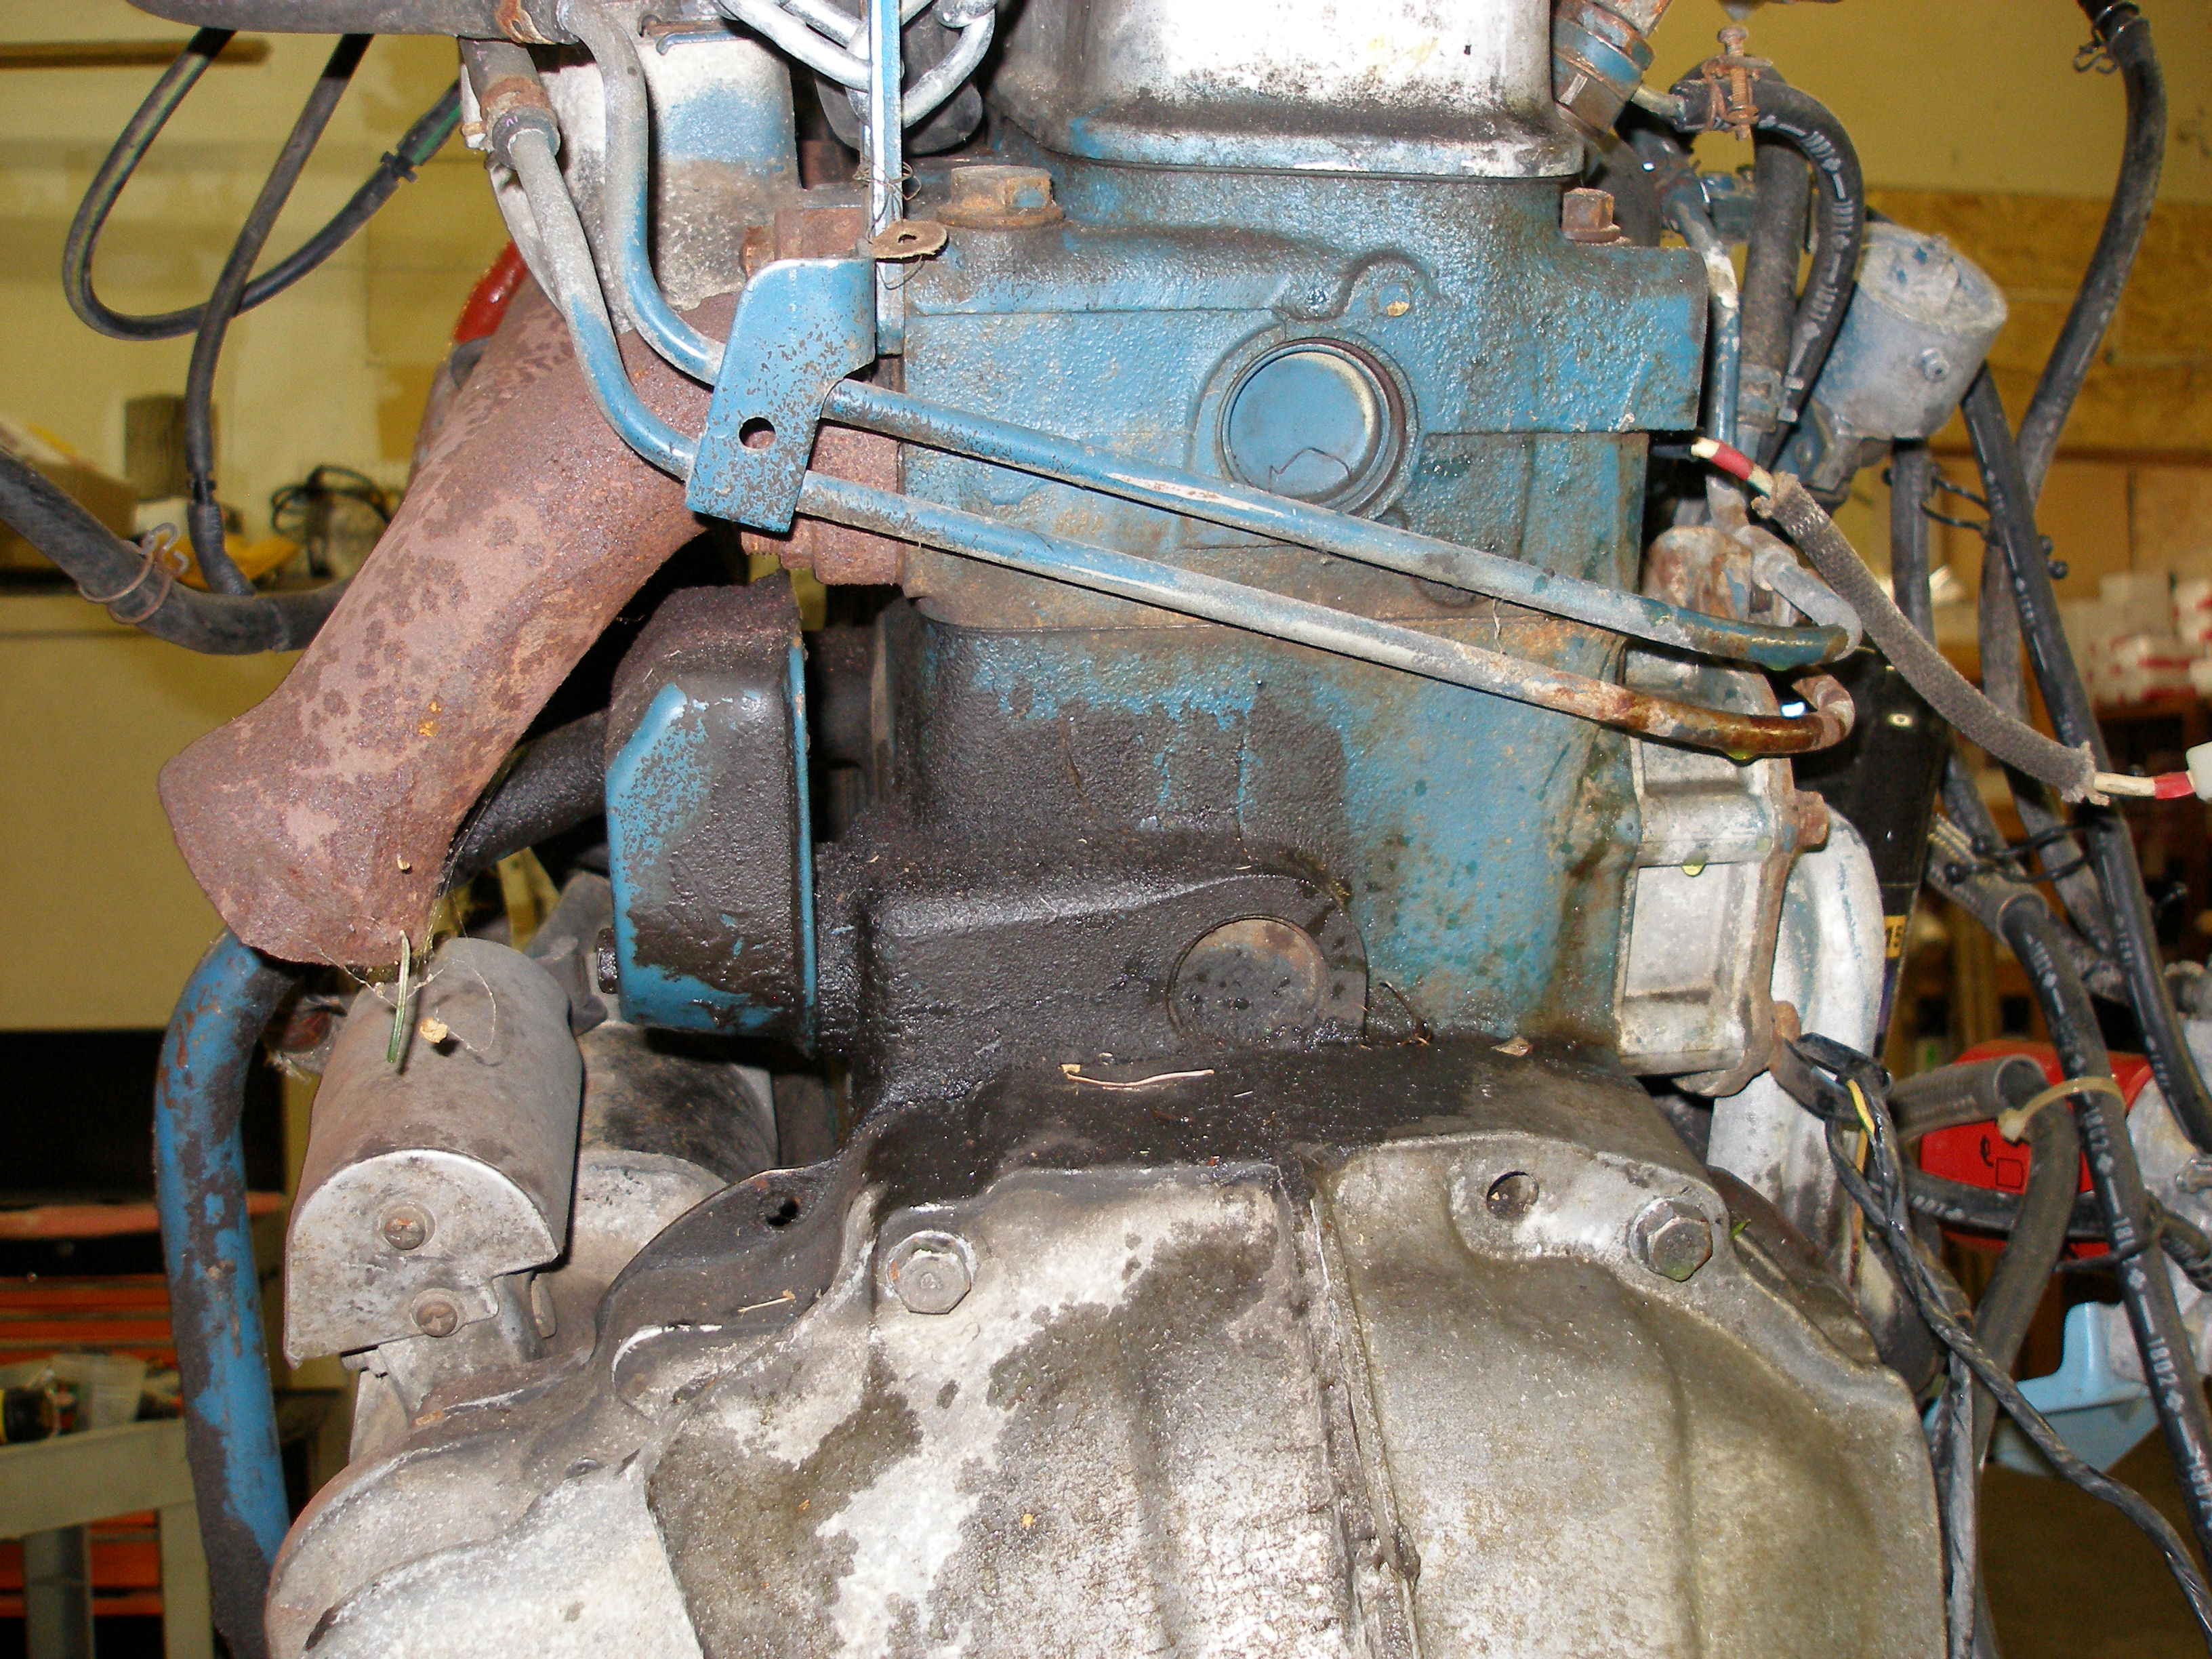
I can get a 3/8" socket on the nut but then I can not get an extension or any adapter into the back of the socket. The clearance is just too tight. The other problem is I need to wrap around the manifold and back away from the firewall and the stuff on the firewall by about 45 degrees before I can attach anything for leverage, thus the reason I used a u-joint.
If need be, I will try a light duty battery operated drill tool I have that has a hammer (or what ever it's called) setting so that it can tap or bang gently at the nut. As was suggested earlier I think a tapping or light hammering effect if done enough times might dislodge it. I will just use some very light duty conservative settings on a tool I use for screws and such. It has multiple settings and a slip (or what ever its called) setting that kicks at very various settings and then slips or skips internally so that it does not rip the tool out of your hands.
Thanks for the warning about not going all out with the u-joints and an impact wrench. I also have a light duty air driven ratchet that has a light hammering like effect and can be modulated with a pressure regulator, if I just remember where I put it last. Unfortunately all I have so far for impact wrench work is a set of long deep sockets.
Anyway, thanks again for the heads up warning, and reminder on the safety issue. It's easy to get sidetracked and forget safety. I doubt I could have held onto the impact tool to the point of breaking a 3/8" u-joint, as I probably would have dropped the impact wrench first and hurt my foot, ouch, LOL, but no sense in testing my strength, LOL.
I am also having fun trying to get the last rear screw out of the hinge on the heat shield. The shield keeps moving and bending making it nearly impossible to hold a socket on the bolt head. Such fun!
Oh, and nice pictures!
Regards,
Mike
1985 Jeep Cherokee Pioneer, 2WD, retrofitted with SD-22 & 5 spd manual trans, a 4X4 Gas Wagoneer ltd. (XJ) Jeep, 4.0 L w/ AW4 auto, and now 2 spare 2wd Jeeps, 87 & 89.
Mike
1985 Jeep Cherokee Pioneer, 2WD, retrofitted with SD-22 & 5 spd manual trans, a 4X4 Gas Wagoneer ltd. (XJ) Jeep, 4.0 L w/ AW4 auto, and now 2 spare 2wd Jeeps, 87 & 89.
-
ecomike
- Posts: 242
- Joined: 19 years ago
- Location: Houston Tx
Well I tried it my way with the hammer setting on the battery powered drill and some adapters and a 3/8" U-joint. Well all it did was it tried to rattle the hinge pin out of the 3/8" u-joint, but no useful effect on the nut yet.
I did figure out I was missing the nut when I previously spray PB blaster pen lube on the nut so I rigged up a 2 ft hose to the nut / flange area and soaked it this time. While it was soaking I went tool shopping again, about the only fun I had this week! These persistent nuts have been a good excuse to buy those tool accessories I have been druelling over but thought I would never use or need and therefore never bought.
Today's acquisitions were a 1/2" drive, 24" long breaker bar (nice suggestion Al!), an entire metric and SAE (small sizes, under 1") impact sockets, 3 impact u-joints, and get this, I got a 1/4" & 3/8" & 1/2" impact u-joints for just $6.99 , at Harbur Freight with lifetime replacement warranties. I also got a large assortment of impact adapters.
While waisting more time with the electric hammer drill idea, I got another good look at my problem. The firewall is partly in my way, but the brake vacuum booster is the real problem. Thinking about Al's suggestion made me realize while looking at it that there was room for breaker bar! I had not used a breaker bar in over 15 years, maybe longer, just had not needed one in so long that it was not obvious to me that a breaker bar could work. Thanks for the obvious suggestion Al! At least it should have been obvious, guess I was just too close and too frustrated to think.
Going to try it right now.
I did figure out I was missing the nut when I previously spray PB blaster pen lube on the nut so I rigged up a 2 ft hose to the nut / flange area and soaked it this time. While it was soaking I went tool shopping again, about the only fun I had this week!
Today's acquisitions were a 1/2" drive, 24" long breaker bar (nice suggestion Al!), an entire metric and SAE (small sizes, under 1") impact sockets, 3 impact u-joints, and get this, I got a 1/4" & 3/8" & 1/2" impact u-joints for just $6.99
While waisting more time with the electric hammer drill idea, I got another good look at my problem. The firewall is partly in my way, but the brake vacuum booster is the real problem. Thinking about Al's suggestion made me realize while looking at it that there was room for breaker bar! I had not used a breaker bar in over 15 years, maybe longer, just had not needed one in so long that it was not obvious to me that a breaker bar could work. Thanks for the obvious suggestion Al! At least it should have been obvious, guess I was just too close and too frustrated to think.
Going to try it right now.
Regards,
Mike
1985 Jeep Cherokee Pioneer, 2WD, retrofitted with SD-22 & 5 spd manual trans, a 4X4 Gas Wagoneer ltd. (XJ) Jeep, 4.0 L w/ AW4 auto, and now 2 spare 2wd Jeeps, 87 & 89.
Mike
1985 Jeep Cherokee Pioneer, 2WD, retrofitted with SD-22 & 5 spd manual trans, a 4X4 Gas Wagoneer ltd. (XJ) Jeep, 4.0 L w/ AW4 auto, and now 2 spare 2wd Jeeps, 87 & 89.
-
ecomike
- Posts: 242
- Joined: 19 years ago
- Location: Houston Tx
Got it off finally. As they say in Hollywood, "Al's the MAN". Thanks Al!
A 1/2" drive 24" long breaker bar with a 3/8" drive 12 mm socket did the trick. Once I gave up on the curved angle approach and went with a breaker bar and moved some more stuff around I found out Al was right, a 3/8" drive socket and extension will fit in there, but it takes a breaker bar to hook up to it and get any leverage on it.
A 1/2" drive 24" long breaker bar with a 3/8" drive 12 mm socket did the trick. Once I gave up on the curved angle approach and went with a breaker bar and moved some more stuff around I found out Al was right, a 3/8" drive socket and extension will fit in there, but it takes a breaker bar to hook up to it and get any leverage on it.
Regards,
Mike
1985 Jeep Cherokee Pioneer, 2WD, retrofitted with SD-22 & 5 spd manual trans, a 4X4 Gas Wagoneer ltd. (XJ) Jeep, 4.0 L w/ AW4 auto, and now 2 spare 2wd Jeeps, 87 & 89.
Mike
1985 Jeep Cherokee Pioneer, 2WD, retrofitted with SD-22 & 5 spd manual trans, a 4X4 Gas Wagoneer ltd. (XJ) Jeep, 4.0 L w/ AW4 auto, and now 2 spare 2wd Jeeps, 87 & 89.
-
ecomike
- Posts: 242
- Joined: 19 years ago
- Location: Houston Tx
OK, got it all apart, and I have a few rush questions.
One, is the Felpro gasket I bought. Only one, brand I could find anywhere. The old gasket makes the new Felpro look like junk. Even used, the old gasket looks better, except it is dirty (some carbon in spots). The old one seems to be metallic on both sides.
So is the Felpro good enough?
Should I consider reusing the old gasket, as it is still solid and in one piece, it looks like solid metal on both sides with a softer material in the middle, kinda the reverse of the Felpro which has a metal core and flimsy pressed fiber composite on the outer sides. The old one almost looks like it was meant to be reusable.
Next, though I did not have any known (by me) exhaust manifold leaks, the exhaust manifold is not that great looking ( a few shallow rust pits) on the two outer single port matting surfaces. The engine head surface looks great. So I am wonder if I should check the exhaust manifold for flatness, and maybe get it sanded flatter, is this something I can do myself, or not? Do muffler shops work on exhaust manifolds at all?
Do these manifolds warp easily? Are they forgiving, not easily warped, and easy to get a good seal....?
Next problem. Studs! I have found and bought two different length studs to replace the old studs that are not reusable. Problem is they are not an exact length swap for the old ones, except one of them will work if I thread the long threaded side into the head until it bottoms in the head, then it is the same length as the old one on the remaining exposed side. However, the unthreaded part of the stud does not bottom on the outer head and tighten on the outside, but the stud instead bottoms on the inside of the head and tightens there instead.
SO, If I use these studs this way, is this OK, or is this likely to cause future loosening of the manifold bolts and manifolds? I am planning to use the blue thread locker for hight heat areas on those threads already if that will affect the answer. My only other option is to waist a few hours dragging out a grinder or dremel cutting wheel rig to make them the same length as the old ones. Did I mention that I hate extra work like making my own bolts?
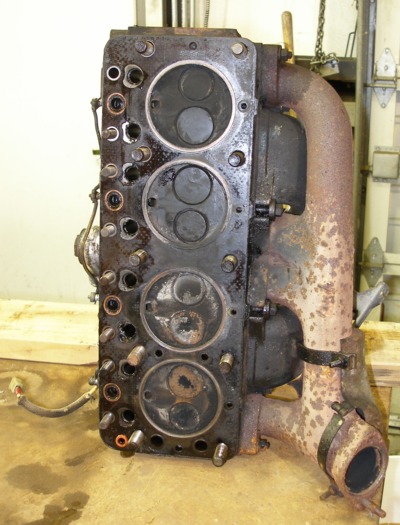
Also, I got the exhaust pipe off the exhaust manifold ( I still need to extract or drill out the old studs on the bottom outlet ) and I was surprised to find, or should I say not find any kind of replacable donut in the seal area. The parts stores say it does not call for one on their computers. The down pipe looks like it has a permanent metal donut built onto the pipe, which does not allow me to easily replace the entire down pipe like I was planning!!????
Is this correct? So if that area is corroded and looks questionable ( and the manifold side of the outlet seal looks worn maybe on one side (???) what should I do? What are the options? I am going to drive over to a custom muffler shop in the morning to see what they have to say.
After all this frustration and work, I want this repair to last a long time, but I am running short on time to keep fiddling with it. Hell I have waisted enough time to have put a turbo on it by now, LOL.
Thanks again for the help.
One, is the Felpro gasket I bought. Only one, brand I could find anywhere. The old gasket makes the new Felpro look like junk. Even used, the old gasket looks better, except it is dirty (some carbon in spots). The old one seems to be metallic on both sides.
So is the Felpro good enough?
Should I consider reusing the old gasket, as it is still solid and in one piece, it looks like solid metal on both sides with a softer material in the middle, kinda the reverse of the Felpro which has a metal core and flimsy pressed fiber composite on the outer sides. The old one almost looks like it was meant to be reusable.
Next, though I did not have any known (by me) exhaust manifold leaks, the exhaust manifold is not that great looking ( a few shallow rust pits) on the two outer single port matting surfaces. The engine head surface looks great. So I am wonder if I should check the exhaust manifold for flatness, and maybe get it sanded flatter, is this something I can do myself, or not? Do muffler shops work on exhaust manifolds at all?
Do these manifolds warp easily? Are they forgiving, not easily warped, and easy to get a good seal....?
Next problem. Studs! I have found and bought two different length studs to replace the old studs that are not reusable. Problem is they are not an exact length swap for the old ones, except one of them will work if I thread the long threaded side into the head until it bottoms in the head, then it is the same length as the old one on the remaining exposed side. However, the unthreaded part of the stud does not bottom on the outer head and tighten on the outside, but the stud instead bottoms on the inside of the head and tightens there instead.
SO, If I use these studs this way, is this OK, or is this likely to cause future loosening of the manifold bolts and manifolds? I am planning to use the blue thread locker for hight heat areas on those threads already if that will affect the answer. My only other option is to waist a few hours dragging out a grinder or dremel cutting wheel rig to make them the same length as the old ones. Did I mention that I hate extra work like making my own bolts?
Also, I got the exhaust pipe off the exhaust manifold ( I still need to extract or drill out the old studs on the bottom outlet ) and I was surprised to find, or should I say not find any kind of replacable donut in the seal area. The parts stores say it does not call for one on their computers. The down pipe looks like it has a permanent metal donut built onto the pipe, which does not allow me to easily replace the entire down pipe like I was planning!!????
Is this correct? So if that area is corroded and looks questionable ( and the manifold side of the outlet seal looks worn maybe on one side (???) what should I do? What are the options? I am going to drive over to a custom muffler shop in the morning to see what they have to say.
After all this frustration and work, I want this repair to last a long time, but I am running short on time to keep fiddling with it. Hell I have waisted enough time to have put a turbo on it by now, LOL.
Thanks again for the help.
Regards,
Mike
1985 Jeep Cherokee Pioneer, 2WD, retrofitted with SD-22 & 5 spd manual trans, a 4X4 Gas Wagoneer ltd. (XJ) Jeep, 4.0 L w/ AW4 auto, and now 2 spare 2wd Jeeps, 87 & 89.
Mike
1985 Jeep Cherokee Pioneer, 2WD, retrofitted with SD-22 & 5 spd manual trans, a 4X4 Gas Wagoneer ltd. (XJ) Jeep, 4.0 L w/ AW4 auto, and now 2 spare 2wd Jeeps, 87 & 89.
-
asavage
- Site Admin
- Posts: 5452
- Joined: 19 years ago
- Location: Oak Harbor, Wash.
- Has thanked: 2 times
- Been thanked: 3 times
- Contact:
RTV film again: yes.ecomike wrote:So is the Felpro good enough?
The RTV (any type) will seal minor intake air leaks. It is completely ineffective for the exhaust ports, which is where the composite materials sandwich plays a role. It'll be fine, as long as . . .
. . . you have a flat, clean mating surface.Next, though I did not have any known (by me) exhaust manifold leaks, the manifold is not that great looking on the two outer single port mating surfaces. The engine head surface looks great. So I am wonder if I should check the exhaust manifold for flatness, and maybe get it sanded flater, is this something I can do myself, or not? Do muffler shops work on exhaust manifolds at all?
I haven't seen a muffler shop equipped to machine manifold surfaces. I had mine done by an automotive machine shop, cost was somewhere between $28-40 and was absolutely necessary in my case.
You can do a crude flatness check (for an exhaust manifold, anyway) by first using a wire brush wheel on a drill (or a wire wheel on a bench grinder setup) to clean down to metal the exhaust manifold's gasket surfaces, then lay a steel rule on edge across the gasket surfaces, all across. Gross warpage can be seen using this crude method. You could also buy a straightedge, the proper tool for this job, but I don't recommend it.
Snap-On 24" straight edge, GA438A, $96

I had one very bad one, haven't seen a similar problem on my other two. If it was sealing with no visible carbon tracks to the outside (by the gaskets) on the head paint, I would assume it is probably OK to reinstall.Do these manifolds warp easily? Are they forgiving, not easily warped, and easy to get a good seal....?
It's OK to have extra length on the outside (clearance of other parts permitting). It is not OK to bottom the stud in the head's blind holes. While you can assemble it this way, someday someone will curse your name if they have to try to remove it.I have found and bought two different size studs to replace the studs that not reusable. Problem is they are not an exact length swap for the old ones . . .
However, a bottomed stud is not likely to come out on its own either.
Studs are often bottomed in aluminum assemblies, but not cast iron.
Locktite, or any anaerobic threadlocker, is ineffective at the temps the exhaust studs run at. Only mechanical locking is effective, and no nylock nuts either! If you seriously want threadlocking, consider ovaled pattern nuts or dimpled nuts, but in my opinion these are not necessary for the SD. The OEM setup is adequate, until you add a turbo, and maybe even then.I am planning to use the blue thread locker for hight heat areas on those threads already if that will affect the answer.
If your studs are class 10.9 or 12.9, it might take a whole minute to chop excess length off using a Dremel 275 single-speed or equivalent (~35 on eBay, $60 new), a 402 mandrel (about $5) and one or two 426 reinforced cutoff wheels (about $2 ea if purchased in the small pack; $1 ea if you buy the bulk pack of (20)). Include setup time and cleanup time, and I could probably chop four studs in about fifteen minutes. This is assuming using a bench vise and double-nutting one end of the stud to provide a way to retain the stud in the vise without damaging the threads. Always put an extra nut on the end of the stud you're cutting, so when you're done cutting, and after you've dressed the end of the stud with a flat file or whatever, running the nut off makes sure that any slightly deformed threads at the end are put back into position. You can run your 8mm die on instead of a plain nut, but a nut works just fine.My only other option is to waist a few hours dragging out a grinder or dremel cutting wheel rig to make them the same length as the old ones.
In a pinch, you can use a C-clamp on a board or benchtop to hold the double-nuts on the stud. Or even Vise-Grips on a sturdy, thin surface like the rear bumper of your (neighbor's) truck, if it has a metal bumper.
Given a bench vise and double-nuts and new hacksaw blade, you could use this cruder tool, compensated by more flat-file time at the backend. If you try a hacksaw, you'd had better have the stud well and truly clamped, or you'll likely spill blood all over the stud before you're done.
But, again, extra outside threaded length may not be a problem.
You can't buy everything, not even for a new Chevy; fabrication is part of the DIY world, and in the professional world as well.Did I mention that I hate extra work like making my own bolts?
Sure, you can replace the headpipe . . . as long as it's with an OEM headpipe, or an OEM-style headpipe that your muffler guy makes for you.Also, I got the exhaust pipe off the exhaust manifold ( I still need to extract or drill out the old studs on bottom outlet ) and I was surprised to find, or should I say not find any kind of replacable donut in the seal area. The parts stores say it does not call for one on their computers. The down pipe looks like it has a metal donut built onto to it, which does not allow me to easily replace the entire down pipe like I was planning!!?
Old stock photo:

The seal is metal-to-metal, and the solid carbon output of the SD quickly seals minor surface imperfections in this area. Your leak was due to a broken stud, wasn't it?Is this correct? So if that area is corroded and looks questionable ( and the manifold side of the outlet seal looks worn maybe on one side (???) what should I do? What are the options? I am going to drive over to a custom muffler shop in the morning to see what they have to say.
A competent muffler shop that is equipped to perform custom work (nota ll can) should have no problem fabricating a new bubble seal on a new headpipe, but are you certain you need a new pipe? Most will try to talk you into trying to gasket it, and it can be done, but you will want a muffler fabricator with experience to fab the headpipe cone gasket socket, not someone who's only got a year behind them.
There are several ways to skin this particular cat.
I think you seriously underestimated the time it would take to a) repair an engine that has been in service for a quarter century, and for which the local FLAPS is usually uncooperative in obtaining parts; b) repair an engine that is non-native to the chassis in which it has found itself; c) accomplish this repair given your assets (tools, work area, experience & training).After all this frustration and work, I want this repair to last, but I am running short on time to keep fiddling with it. Hell I have waisted enough time to have put a turbo on it by now, LOL.
If you think adding a turbo would have taken maybe three times the amount of time you've spent to date, you are probably still underestimating by an order of magnitude.
Regards,
Al S.
1982 Maxima diesel wagon, 2nd & 4th owner, 165k miles, rusty & burgundy/grey. Purchased 1996, SOLD 16Feb10
1983 Maxima diesel wagon, 199k miles, rusty, light yellow/light brown. SOLD 14Jul07
1981 720 SD22 (scrapped 04Sep07)
1983 Sentra CD17, 255k, bought 06Jul08, gave it away 22Jun10.
Al S.
1982 Maxima diesel wagon, 2nd & 4th owner, 165k miles, rusty & burgundy/grey. Purchased 1996, SOLD 16Feb10
1983 Maxima diesel wagon, 199k miles, rusty, light yellow/light brown. SOLD 14Jul07
1981 720 SD22 (scrapped 04Sep07)
1983 Sentra CD17, 255k, bought 06Jul08, gave it away 22Jun10.
-
ecomike
- Posts: 242
- Joined: 19 years ago
- Location: Houston Tx
Al,
Thanks for the great fast replies. I was just venting my latest frustrations, I knew it was going to take lots of time, lots of patience, sore bloody knuckles...etc. The Turbo comment was just my attempt at late night humor...
So let's see, looks like you covered most everything, not many questions left.
Won't thread locker work in the head's female thread area considering the bulk metal in that area. Is it a bad idea for later service to use thread locker in the female threads in the head?
I am planning to use copper antisieze on the external threads. I have bought both standard brass, and copper aircraft style locknuts, so I have a choice on the outside nuts, but I will probably use the standard brass nuts.
I have a straight edge carpenters tool I will use first, it's called a square, 24" or larger. The outside of the block and head was too dirty to see any carbon tracking if there was any, but the outer gasket surface on the two outer sections showed signs of carbon tracking in one direction, down and out, that had probably sealed itself off, so I am seriously thinking of finding a machine shop for the E-manifold just be sure.
I was wanting to replace the down pipe itself because it looks to be on its last legs, lots of external pitting in the pipe wall. The donut (I guess bubble seal is the right name for this style?) on the down pipe actually looks OK, the mating area in the bottom outlet of the E-manifold looked a little wobbly, oval shaped or worn and had me a little concerned. Actually I could not detect any leaks, but there was a little side to side movement in the pipe flange bubble seal area. It was not tight. When I tried to snug it up the bolt snapped, so I do not know if a good stud and nut would have tightened it up. There was no detectable leak before it broke, just slop and movement that seemed to me to be indicative of leak potential.
OH, and I have not underestimated the time to do a turbo, that is exactly why you don't see me discussing one on that cool turbo thread,
Regards,
Mike
1985 Jeep Cherokee Pioneer, 2WD, retrofitted with SD-22 & 5 spd manual trans, a 4X4 Gas Wagoneer ltd. (XJ) Jeep, 4.0 L w/ AW4 auto, and now 2 spare 2wd Jeeps, 87 & 89.
Mike
1985 Jeep Cherokee Pioneer, 2WD, retrofitted with SD-22 & 5 spd manual trans, a 4X4 Gas Wagoneer ltd. (XJ) Jeep, 4.0 L w/ AW4 auto, and now 2 spare 2wd Jeeps, 87 & 89.
-
asavage
- Site Admin
- Posts: 5452
- Joined: 19 years ago
- Location: Oak Harbor, Wash.
- Has thanked: 2 times
- Been thanked: 3 times
- Contact:
The release temperature of Locktite is above what most areas of the head should reach. However, what is supposed to hold the stud in place is the interference fit of the unthreaded portion seated against the material around the hole. And, really, with the stud in tension it does not want to come out.ecomike wrote:Won't thread locker work in the head's female thread area considering the bulk metal in that area. Is it a bad idea for later service to use thread locker in the female threads in the head?
Lubricate it or Locktite it, whatever you want.
While brass seems like a nice choice, you will find that you can't get up to torque with std brass nuts. Perhaps with a heavy nut (that really is a true term, see this McMaster-Carr page) in brass you might be able to obtain enough torque, but my experience with using brass nuts on exhaust up at the hot area is that, even double-nutted, they loosen or lose torque and cause exhaust leaks. Fought that on one Hillman for a couple of years before I went . . . stainless.. . . but I will probably use the standard brass nuts.
Regards,
Al S.
1982 Maxima diesel wagon, 2nd & 4th owner, 165k miles, rusty & burgundy/grey. Purchased 1996, SOLD 16Feb10
1983 Maxima diesel wagon, 199k miles, rusty, light yellow/light brown. SOLD 14Jul07
1981 720 SD22 (scrapped 04Sep07)
1983 Sentra CD17, 255k, bought 06Jul08, gave it away 22Jun10.
Al S.
1982 Maxima diesel wagon, 2nd & 4th owner, 165k miles, rusty & burgundy/grey. Purchased 1996, SOLD 16Feb10
1983 Maxima diesel wagon, 199k miles, rusty, light yellow/light brown. SOLD 14Jul07
1981 720 SD22 (scrapped 04Sep07)
1983 Sentra CD17, 255k, bought 06Jul08, gave it away 22Jun10.
-
ecomike
- Posts: 242
- Joined: 19 years ago
- Location: Houston Tx
I have pretty much followed most if not all of your advise. As with any experts, like lawyers stick them in one room and you will get as many opinions as you have experts, or lawyers. Just been trying to make sense of some of the seemingly conflicting advise I got from a jeep engine guru on a few items. Some of it was just confusion on my part.
He uses #272 high temp loctite, or nothing at all in the head for the studs or screws. The 272 is good to 700 F.
I dug out my dremel and a new diamond cutting wheel and it took about 10 minutes to cut one bolt down to size. They were hard to cut, (the other wheels might have been faster) must have been a high, hard grade of steel. I later found a water pump motormite misc bolt kit with zinc plated studs the right size (length), but no idea of the hardness. Bought some but don't if I will use them.
I think I picked up the antiseize idea from another area. My old pump mechanical experience says to use high grade nickel based antiseize on the exhaust manifold and flange pipe threads, but I also thought my other friend had suggested it, but that seems to be wrong? I will probably use some on just the exposed threads after I torque up the nuts.
I figured out that the bellevile washers go on just 4 of the 7 studs, specifically they go on just the studs where the nut clamps on both aluminum and cast iron manifolds! There are only 4 of these, and I have 4 of them, so I did not need more of them afterall. I did waste a lot of time finding out no one seems to stock them. Then the other 3 studs are exhaust manifold only locations and they just get a nut. I bought some small flat stainless washers to go under the nuts, but they do not seem to be required. For some reason I can not find 8 mm x1.25 stainless nuts, I have looked high and low, but I was able to find some good brass ones that were in the exhaust bolt inventory at one store with the studs, so I will be using them for now. No way will I use steel nuts, that's just insane fighting those damn things after they rust.
OK, I got the E manifold face nice and flat, surprisingly with a hand file an some patience. Got it down to at least .003" if not .001" flatness.
I bought a map gas -O2 benzomatic set up that I will try in the morning to get those last 2 nasty studs out of the outlet end of of the E manifold. Once that is done, I should be ready to start putting things back together.
I took a closer look at the male and female end of the pipe to manifold connection, the "bubble seal" surfaces, and they all looked much better than I previously thought after a little light cleaning and a better understanding of how the two seal. The Bubble and the matting seal in the first 12" of down pipe all looks good, the next foot of pipe is very old pipe on it's last legs, followed by new pipe that runs the rest of the way to the muffler that I had a Muffler shop install last year. I may need to have that bad 12 " piece cut out, and a new flange installed while it is is cut open, and that should do it.
The double nut suggestion was new to me on holding and cutting bolts, studs to length, it worked great, thanks! And no I did not use the neighbors bumber, he was gone at the time, LOL!
Oh, and on the brass torque thing, the Nissan book only calls for 10-13 lb-ft of torque as I recall. Jon (my Jeep buddy) says the brass will harden over time as it heat cycles. He says just to check and re-torque then once or twice early on. I will keep my opens for stainless nuts.
asavage wrote:The release temperature of Locktite is above what most areas of the head should reach. However, what is supposed to hold the stud in place is the interference fit of the unthreaded portion seated against the material around the hole. And, really, with the stud in tension it does not want to come out.ecomike wrote:Won't thread locker work in the head's female thread area considering the bulk metal in that area. Is it a bad idea for later service to use thread locker in the female threads in the head?
Lubricate it or Locktite it, whatever you want.
While brass seems like a nice choice, you will find that you can't get up to torque with std brass nuts. Perhaps with a heavy nut (that really is a true term, see this McMaster-Carr page) in brass you might be able to obtain enough torque, but my experience with using brass nuts on exhaust up at the hot area is that, even double-nutted, they loosen or lose torque and cause exhaust leaks. Fought that on one Hillman for a couple of years before I went . . . stainless.. . . but I will probably use the standard brass nuts.
Regards,
Mike
1985 Jeep Cherokee Pioneer, 2WD, retrofitted with SD-22 & 5 spd manual trans, a 4X4 Gas Wagoneer ltd. (XJ) Jeep, 4.0 L w/ AW4 auto, and now 2 spare 2wd Jeeps, 87 & 89.
Mike
1985 Jeep Cherokee Pioneer, 2WD, retrofitted with SD-22 & 5 spd manual trans, a 4X4 Gas Wagoneer ltd. (XJ) Jeep, 4.0 L w/ AW4 auto, and now 2 spare 2wd Jeeps, 87 & 89.
-
asavage
- Site Admin
- Posts: 5452
- Joined: 19 years ago
- Location: Oak Harbor, Wash.
- Has thanked: 2 times
- Been thanked: 3 times
- Contact:
Depends on what you call "good"!ecomike wrote:He uses #272 high temp loctite, or nothing at all in the head for the studs or screws. The 272 is good to 700 F.
According to the Technical Data Sheet for Loctite 272, by 394°F the cured bond strength is down to about 65%. I don't think that by 450°F it's going to be doing much good.
Chuck the diamond wheel. Dremel mandrel No. 402, Dremel reinforced cutoff wheel 426. Trust me (next time).I dug out my dremel and a new diamond cutting wheel and it took about 10 minutes to cut one bolt down to size. They were hard to cut, (the other wheels might have been faster) must have been a high, hard grade of steel.
I am not an anti-seize purist; to me, any anti-seize compound will do. I have been operating under the assumption that most over-the-counter anti-seize compounds sold in auto parts stores are probably flaked lead and cheap grease. The lead won't oxidize at the temps it encounters in automotive use.I think I picked up the antiseize idea from another area. My old pump mechanical experience says to use high grade nickel based antiseize on the exhaust manifold and flange pipe threads, but I also thought my other friend had suggested it, but that seems to be wrong? I will probably use some on just the exposed threads after I torque up the nuts.
I have a jug of the copper-based stuff, I use it when I think of it, but with the stuff I work with, anything will do. I didn't know that there was nickel-based anti-seize until you mentioned it. Probably specialized industrial?
Pretty sure my local Tru-Value hardware has them (in Midwest Fastener branding), but they're certainly available all over the internet, for example here.For some reason I can not find 8 mm x1.25 stainless nuts, I have looked high and low . . .
Antiseize, and they come right off, even on the east coast (so I'm told). Steel tends to hold its torque, too.No way will I use steel nuts, that's just insane fighting those damn things after they rust.
Cast iron is very forgiving. .003" is plenty, the gasket is compliant enough for that. If you don't have any localized low areas -- that's the problem with using a file for this kind of work. I hope you used the longest file you could find.OK, I got the E manifold face nice and flat, surprisingly with a hand file an some patience. Got it down to at least .003" if not .001" flatness.
If you have 3/8" nubbin left to grab with Vise-Grips or similar tool, if you can get the cast iron ear red (not a dull red, but reasonably bright), you'll be able to back out the broken bolt/stud. If you can't get enough heat into the ear (never heat the stud, of course, only the surrounding metal, preferably from the back side), or don't have enough stud left to effectively grab, go directly to: face off the broken stud, flush with the manifold, center punch accurately, drill it out oversize and put in a nice 8mm helicoil or brand-x insert and be done with it. It isn't worth the time and possible tragedy of other methods (which include: weld a nut to remains of stud, drill and chase threads, various drill-n-extractor methods). The helicoil method always gives a nice, professional, and importantly high-strength finished product. BTDT many, many times.I bought a map gas -O2 benzomatic set up that I will try in the morning to get those last 2 nasty studs out of the outlet end of of the E manifold.
Lastly, I'm not an expert, I've just spent so much time playing one at work that I sound like one. I can still be educated.
Regards,
Al S.
1982 Maxima diesel wagon, 2nd & 4th owner, 165k miles, rusty & burgundy/grey. Purchased 1996, SOLD 16Feb10
1983 Maxima diesel wagon, 199k miles, rusty, light yellow/light brown. SOLD 14Jul07
1981 720 SD22 (scrapped 04Sep07)
1983 Sentra CD17, 255k, bought 06Jul08, gave it away 22Jun10.
Al S.
1982 Maxima diesel wagon, 2nd & 4th owner, 165k miles, rusty & burgundy/grey. Purchased 1996, SOLD 16Feb10
1983 Maxima diesel wagon, 199k miles, rusty, light yellow/light brown. SOLD 14Jul07
1981 720 SD22 (scrapped 04Sep07)
1983 Sentra CD17, 255k, bought 06Jul08, gave it away 22Jun10.
-
ecomike
- Posts: 242
- Joined: 19 years ago
- Location: Houston Tx
All I know is the Permatex 272 package said maximum temperature is 700 F. I assume that means it liquifies and or begins to thermally decompose (gas) above 700 F. Jon (my jeep guru) uses it, and I already used it today, so the test is underway I guess.
I had already bought some diamond wheels last year to try on another project, but had not used them yet. It was time to see how they worked!
In another life I sold industrial grade antiseize compounds for oil field use, etc. The Nuclear grade stuff was called NeverSeize TM, it was nickel based, best damn stuff I ever used. This Pematex stuff I got recently looks just like it. Good 1600°F! Sounds like it, but I am not 100% positive.
I guess I am going to have to preshop more fasteners on the internet again, but I do recall looking for those in stainless (the studs at least, they may have had stainless nuts but I gave up on stainless when I could not find the studs in stainless) on the internet with no luck last time when I bought the water pump and the original studs for this job about 9 months ago. Even had about 6 good referrals.
Yes, I had an excellent, unused, very sharp clean cutting, about 12"x1" flat file for the job, with a real good handle grip, Stanley brand. I had several other files I tried first, picked the best one and used it. I finally got it down to about .001", with no local problems. I amazed myself! I had the local machine shop check and put his blessing on it. I had him pull the old rusted studs for me too. The threads were worn (rusted), but just barely good enough for one more usage. Will probably have to drill and helicoil them next time.
I must agree, the helicoil is a great, superior product. I had never used one before, but was forced to for the first time on the sheared starter mount bolt a few weeks back on this beast. I tried drilling and taping the old bolt remains, but the aluminum did not cooperate as I had hoped (too soft) , so in went the helicoil. I was surprised at how well it gripped considering it was an aluminum bell housing around it. It seemed to me to be stronger than the original threads.
I just started putting things back together when I found myself picking up one of Philip's bad habits, and I started painting the parts blue before I reinstalled them (just really not me...), no I did not paint the exhaust manifold, but the intake is Blue now!
My math professor at San Jacinto College use to call us amateurs (math students taken calculus), a year later I meet him one day and told him I had acquired an encyclopedia of mathematics, and discovered that the 21 hours of college math I had taken was less than 5% of the encyclopedia. The other 95% was math I still never seen before. I was astounded. At that point, he said when I realized how little I really knew of mathematics, that I was no longer an amateur, LOL.
Well, I hope to back on the road by Wednesday.
I had already bought some diamond wheels last year to try on another project, but had not used them yet. It was time to see how they worked!
In another life I sold industrial grade antiseize compounds for oil field use, etc. The Nuclear grade stuff was called NeverSeize TM, it was nickel based, best damn stuff I ever used. This Pematex stuff I got recently looks just like it. Good 1600°F! Sounds like it, but I am not 100% positive.
I guess I am going to have to preshop more fasteners on the internet again, but I do recall looking for those in stainless (the studs at least, they may have had stainless nuts but I gave up on stainless when I could not find the studs in stainless) on the internet with no luck last time when I bought the water pump and the original studs for this job about 9 months ago. Even had about 6 good referrals.
Yes, I had an excellent, unused, very sharp clean cutting, about 12"x1" flat file for the job, with a real good handle grip, Stanley brand. I had several other files I tried first, picked the best one and used it. I finally got it down to about .001", with no local problems. I amazed myself! I had the local machine shop check and put his blessing on it. I had him pull the old rusted studs for me too. The threads were worn (rusted), but just barely good enough for one more usage. Will probably have to drill and helicoil them next time.
I must agree, the helicoil is a great, superior product. I had never used one before, but was forced to for the first time on the sheared starter mount bolt a few weeks back on this beast. I tried drilling and taping the old bolt remains, but the aluminum did not cooperate as I had hoped (too soft) , so in went the helicoil. I was surprised at how well it gripped considering it was an aluminum bell housing around it. It seemed to me to be stronger than the original threads.
I just started putting things back together when I found myself picking up one of Philip's bad
My math professor at San Jacinto College use to call us amateurs (math students taken calculus), a year later I meet him one day and told him I had acquired an encyclopedia of mathematics, and discovered that the 21 hours of college math I had taken was less than 5% of the encyclopedia. The other 95% was math I still never seen before. I was astounded. At that point, he said when I realized how little I really knew of mathematics, that I was no longer an amateur, LOL.
Well, I hope to back on the road by Wednesday.
Regards,
Mike
1985 Jeep Cherokee Pioneer, 2WD, retrofitted with SD-22 & 5 spd manual trans, a 4X4 Gas Wagoneer ltd. (XJ) Jeep, 4.0 L w/ AW4 auto, and now 2 spare 2wd Jeeps, 87 & 89.
Mike
1985 Jeep Cherokee Pioneer, 2WD, retrofitted with SD-22 & 5 spd manual trans, a 4X4 Gas Wagoneer ltd. (XJ) Jeep, 4.0 L w/ AW4 auto, and now 2 spare 2wd Jeeps, 87 & 89.
-
asavage
- Site Admin
- Posts: 5452
- Joined: 19 years ago
- Location: Oak Harbor, Wash.
- Has thanked: 2 times
- Been thanked: 3 times
- Contact:
Are you sure that's what's on the package?ecomike wrote:All I know is the Permatex 272 package said maximum temperature is 700 F.
I just checked at my FLAPS, which is a NAPA now and carries the NAPA-branded Permatex products. Neither Red nor High-Temp Red goes above 450°F.
Henkel, the parent company of Permatex, says 450°F top too, on this page.
If your packaging says 700°F, could you take a scan or pic of it and email it to me?
-
asavage
- Site Admin
- Posts: 5452
- Joined: 19 years ago
- Location: Oak Harbor, Wash.
- Has thanked: 2 times
- Been thanked: 3 times
- Contact:
In general, you want to avoid stainless-on-stainless, due to galling issues at high temps, even with anti-seize. In a former life, I was involved with high-temp SS/SS assemblies in somewhat of an engineering capacity, and we relearned some expensive lessons there.ecomike wrote:I guess I am going to have to preshop more fasteners on the internet again, but I do recall looking for those in stainless (the studs at least, they may have had stainless nuts but I gave up on stainless when I could not find the studs in stainless) . . .
SS nuts, or SS studs, but not both, is best unless you've got a very good reason to need everything SS, such as marine or aerospace.
Regards,
Al S.
1982 Maxima diesel wagon, 2nd & 4th owner, 165k miles, rusty & burgundy/grey. Purchased 1996, SOLD 16Feb10
1983 Maxima diesel wagon, 199k miles, rusty, light yellow/light brown. SOLD 14Jul07
1981 720 SD22 (scrapped 04Sep07)
1983 Sentra CD17, 255k, bought 06Jul08, gave it away 22Jun10.
Al S.
1982 Maxima diesel wagon, 2nd & 4th owner, 165k miles, rusty & burgundy/grey. Purchased 1996, SOLD 16Feb10
1983 Maxima diesel wagon, 199k miles, rusty, light yellow/light brown. SOLD 14Jul07
1981 720 SD22 (scrapped 04Sep07)
1983 Sentra CD17, 255k, bought 06Jul08, gave it away 22Jun10.
-
ecomike
- Posts: 242
- Joined: 19 years ago
- Location: Houston Tx
Al,
Good catch sorry for the error, I was confusing another product with it, specifically Copper high temp RTV, which is the 700F stuff, not the 272 Red locktight, my mistake. The 272 Red Locktight IS only 450 F. Just trying to do too much at once, and making errors. , again.
Good news, got the manifolds installed and water pump on, now for TB, A/C and radiator.
Good catch sorry for the error, I was confusing another product with it, specifically Copper high temp RTV, which is the 700F stuff, not the 272 Red locktight, my mistake. The 272 Red Locktight IS only 450 F. Just trying to do too much at once, and making errors.
Good news, got the manifolds installed and water pump on, now for TB, A/C and radiator.
Regards,
Mike
1985 Jeep Cherokee Pioneer, 2WD, retrofitted with SD-22 & 5 spd manual trans, a 4X4 Gas Wagoneer ltd. (XJ) Jeep, 4.0 L w/ AW4 auto, and now 2 spare 2wd Jeeps, 87 & 89.
Mike
1985 Jeep Cherokee Pioneer, 2WD, retrofitted with SD-22 & 5 spd manual trans, a 4X4 Gas Wagoneer ltd. (XJ) Jeep, 4.0 L w/ AW4 auto, and now 2 spare 2wd Jeeps, 87 & 89.
Who is online
Users browsing this forum: No registered users and 1 guest