There is expensive equipment that is designed to flush the old fluid from the transmission, including the torque converter. There's also fairly inexpensive equipment that does a somewhat less thorough job. We used to get $125-175 for this service. But in any case, you are entrusting your vehicle to someone who may or may not have much interest in performing professional work, and usually are concerned with how much time it takes. This latter factor leads to not using enough flush fluid -- not flushing enough fluid through. However, you can do a very good job of flushing your AT yourself, without (much) expensive equipment, if you're willing to allocate enough time, and round up some items beforehand.
The general idea is to have all of the fluid in the AT replaced. In practice, this isn't possible, but you can fairly easily get to about 80-90% replaced by following the procedure below. The process involves disconnecting one of the flexible transmission cooler lines from the radiator, and letting the transmission's internal pump move the old fluid out into a catch jug. Because the transmission pulls oil from the transmission pan, pumps it through the torque converter, then out to be cooled, by adding fresh oil to the pan and catching old oil at the radiator end, you can do you own flush!
There are several variations on this procedure, and everyone likes to add their own embellishments; I detail what I consider the "least hassle" method below. There are really only two major decisions about the process: to remove the AT pan, or not.
There is virtually no filtering of the ATF in Nissan ATs as installed in the Gen1 Maxima. If you are really lazy, and don't mind using a lot of flushing oil, you do are not required to remove the AT pan. This is the method most "Jiffy Lube" type quick oil change outfits use, because it requires much less time, and time is profit for those types of outfits. It is faster. But most transmissions have some accumulation of solids at the bottom of the pan -- normal -- that could be removed during a "pan drop", and which will tend to re-contaminate any new fluid you install.
For transmissions that have a "real" filter, the filter should be changed as well. This is not an issue with our transmissions, but I mention it for completeness.
Having just performed this service on Carimbo's '82 Sedan diesel last night, I thought I'd attempt to formalize the steps.
Note for those who wish to perform their own transmission flush: the transmission outlet line is the line that connects to the passenger side of the radiator, so connect your drain hose from the driver's side radiator nipple to your drain jug.
Consumables needed:
- Automatic Transmission Fluid (ATF): If you begin with reasonable-color used oil in the trans, and an empty torque converter (ie you had the trans out and drained the converter), this can be as little as six or eight quarts. A typical trans with a converter full of old oil can require sixteen or more quarts to obtain a sufficient clarity of return oil. Not removing the pan and cleaning? Add at least eight more quarts. Always buy extra -- you can usually return the excess later, and it's a bummer to be a quart or three short! Generally, any ATF that says "Dexron II/III" is going to work fine. Many have preferences on brand or type: let's discuss those preferences in a different thread, OK?
- Transmission cooler hose. It looks just like fuel line, but isn't. They're both about a foot long at the radiator connection, so you'll need maybe 30". The most readily available stuff is 5/16", but in most cases the OD will be just enough smaller than the thick OEM lines that you will be forced to replace the . . .
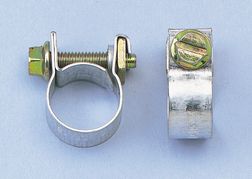
- Hose clamps. I like Fuel Injection line band clamps over the typical worm-drive style. NAPA 705-1226 are 5/16":
- Trans pan gasket. It's easy to get the "filter kit", but the AT "filter" is a brass mesh screen, so there's really no need to remove it, it will not have anything to clean. So save some money and special order the pan gasket only.
- For pan bolts: 10mm socket, extension, ratchet. I recommend 1/4" drive.
- For black plastic splash shield under the radiator: No. 3 Phillips screwdriver. For you Right Coasters, or corrosion areas, be prepared to have to drill the heads off the screws if they're very bad.
- Cooler hoses at radiator: No. 2 Phillips screwdriver. If the hose clamps are very rusty, forget the screwdriver and use a Dremel, hacksaw, or other destructive device (even Vise-Grips) to get the four OEM clamps off. If you're using replacement line other than OEM, chances are you'll have to replace the clamps anyway, because they won't fit.
- Funnel system for filling. Filling requires either a special funnel (std trans funnel will not fit into the fill tube) or an alternative method. I've used a bit of 3/8" steel tubing with some 3/8" fuel line or equivalent hose-clamped to it, then adapted to a std funnel or an electric fuel pump that I use to transfer ATF from the jugs to the fill tube. Be certain that you clamp the steel tube to the hose; you do not want it coming off and falling down into the fill tube!.
- Jugs. Translucent gallon water/milk jugs work very well, because they can't overfill without you being aware of incipient spillage: you can see the level rising easily. But coolant jugs or anything that has a small opening can be used. I do not recommend using a catch pan, as the stuff will splash as it comes out of the line.
- Rags, paper towels, cleaning tools (for AT pan cleaning, splash pan cleaning, etc.)
- Aerosol cleaner. I use cheap carburetor cleaner, but brake cleaner will do as well. Whatever is on sale is OK. You will be using it primarily to spray up at deposits/coating on the parts of the transmission that that pan covers.
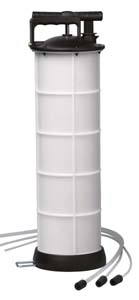
- Optional: vacuum device. Handy for sucking oil from the pan before removing it, sucking old oil from the cooler return line. I like the larger Mity-Vac:
Flush procedure:
- You have to remove the AT pan, so if you have a vacuum device (I use the 1.5 gallon Mity-Vac, but Kassim came up with an ingenious method using intake manifold vacuum and a jug; other methods also apply), suck two quarts out of the AT pan via the dipstick tube. My Mity-Vac comes with several lengths of semi-rigid nylon tubing @ 4' each, which can be coupled together and which make this very easy and less messy.
- Jack the car up level, high enough so you can get the front splash shield off/on and service the AT pan. Use jack stands or really good blocking, and never, ever use cinder blocks or bricks.
- Remove AT pan and clean the pan to "very clean". If you wipe a white paper towel on the inside, it should not show any grey.
- Use your aerosol carb cleaner (or brake cleaner) and spray off the exposed parts of the transmission that the pan covered. The objective is to remove the common visible coating of gray crud on the filter and exposed valve body. This is not a critical step.
- Got a vacuum device? Skip to next step. No vacuum? Skip down several steps, and find a way to blow air into the driver's side cooler hardline at the radiator, blowing old oil back to the pan area, then come back here. This step is not critical.
- Reinstall AT pan with new gasket. Make certain that the gasket surfaces are both clean and oil-free! Careful tightening the 6mm bolts (10mm heads), as they are not particularly high-strength items. Also, the gasket can creep out of place, so make certain that you start all the little bolts before tightening any of them.
- Remove the black plastic front splash pan under the radiator (six No. 3 Phillips head screws). Clean it off if you wish, it generally collects a lot of crud.
- Remove both 8mm AT cooler hoses between the hardlines and the radiator nipples. Oil will drip, but not a whole lot. Two drain pans are usually needed to collect oil from all four connections. The OEM double-wire clamps are sometimes so rusty that they cannot be re-used, or even removed without a Dremel or equivalent. I have had to use a utility knife (razor blade) and cut the lines off the radiator nipples on a couple of cars; tugging on them threatened the radiator's integrity, that's how much force would have been required.
- Cut new lines, using only hose rated for transmission cooler duty.
- Got a vacuum device? Suck the fluid out of the driver's side hardline, which is the return line to the trans. Not critical.
- Fully install the passenger side line. It is not unusual to have the hose clamps "tight" but still be able to twist/wiggle the line on nipple or hardline: don't worry about it, it won't leak. Install the driver's side line only on the hardline, and let the other end dangle.
- Install a temporary length of 5/16" line (any kind) on the driver's side radiator cooler nipple, long enough to direct out to a catch jug.
- Refill the trans' pan with two quarts of ATF.
- You can add as much as three quarts and not have it come immediately out the trans' vent line (at least, on the L3N71B) but two quarts is the normal full level.
- Is the car level? Is the line from the driver's side radiator nipple in the catch jug? If you helper holding it in the jug?
- Glow and start the engine. As soon as practical, shift into every gear selector position, pausing for a few seconds in each range. Including Park (make sure the brakes are applied when you shift to Park, or the Park pawl can be damaged). If you have an OD trans, try to get it to upshift to OD (ie run it fast enough to shift to OD) Your helper will yell when fluid stops flowing strongly into the jug, at which point you should turn off the engine. You do not need to shift to Park to shut off the engine.
- Add two more quarts of ATF via the fill tube.
- Lather, rinse, repeat. You are aiming for the same color of oil leaving the drain hose as goes in the fill tube.
- Remove the temporary drain line on driver's side radiator nipple, connect and clamp new driver's side hose.
- Reinstall black plastic splash shield.
- If you didn't refill the AT after the last run, do so now. Two quarts is very close to warm/Full for the L3N71b.
- Lower car, clean up. No job is complete until the work area is clean and the tools wiped down and put away.
If your fluid was especially bad, it is not unusual for the ATF to become several shades darker fairly quickly -- sometimes by the next oil change. The reason isn't because you didn't get sufficient fluid removed, rather it's because the torque converter is a big centrifugal filter that spins solids to its inner surface. The new fluid is loosening up and suspending those old solids. This is especially true with certain vintage Toyota ATs. If you flush often, the interval that it requires for the ATF to darken will increase.
L3N71b "filter" (click on image for larger):